
Bloatware are pre-installed programs within your operating system, without the ability to uninstall immediately, in order for their manufacturers to put an extra dollar in their pocket.
Microsoft is no stranger to bloatware logic. Windows 10 may seem like the basic program, but behind it there are a variety of programs that you just do not need. Fortunately, you can get rid of bloatware. Let's see how to uninstall them by saving space and ads.
How to remove Bloatware from Windows 10.
Windows 10 comes with a pretty large amount of bloatware. In most cases, they are easy to remove using traditional uninstall. In some others, however, not. In these cases you will need to use different removal options, such as using PowerShell commands or third-party programs.
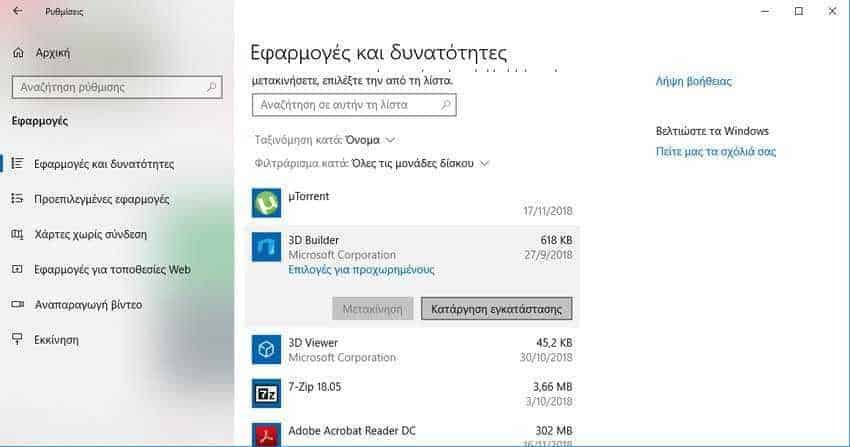
If in Windows 10 you go to “Settings > Applications > Applications and possibilities” to uninstall a program, then you definitely won't find enough Bloatware there.
Why; Microsoft and other manufacturers that deliver products with bloatware do so to take advantage of their use, so simply installing them is not in their best interest.
Uninstall Bloatware from Windows 10
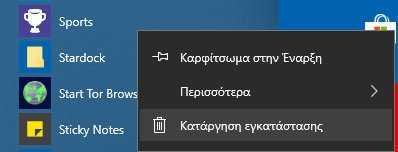
Some of the Windows 10 bloatware is easy to remove using a regular uninstall. This seems to work for several apps included in the Windows 10 installation package, such as Xbox, Money, Microsoft News, Sports and a few others that are in Start menu. All you have to do is right-click on the app you want and select Uninstall.
Microsoft has simplified the process for removing the most cosmetic items in Windows 10. But digging around, you'll quickly realize that Microsoft doesn't treat all apps equally. Indeed, applications that Microsoft considers part of the core of Windows 10 require that useste PowerShell commands to hide or remove them or use third-party tools. Others, like Cortana, simply cannot be 100% removed from your system.
Using PowerShell to remove Bloatware
PowerShell is an important Windows system management software. While some people compare PowerShell to Command Prompt, they are basically two very different programs. But PowerShell gives you more control over your Windows installation. In this case, you can use a set of PowerShell commands to either hide or remove bloatware from Windows 10.
First, open the PowerShell command prompt. To do this, type PowerShell in the search bar of the "Start" menu. If you have several related programs, choose Windows PowerShell. Once you find it right click on it and select "Run as administrator". This ensures that you have control of the entire system.
Next, you need to decide what to remove. PowerShell commands can remove any packages ranging from "Music Groove" to Bing Health and Fitness.
Hide applications using the command "Remove-AppxPackage"
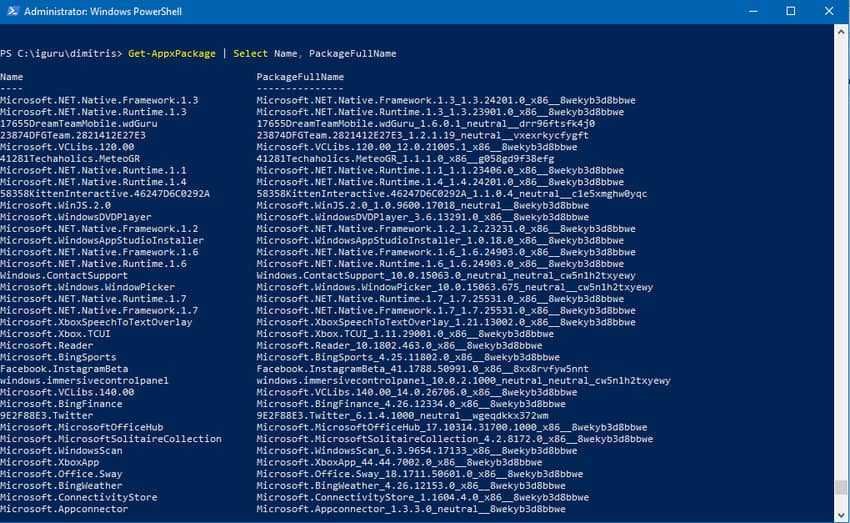
The Get-AppxPackage command will give you enough information about each UI application installed on your system. The information you will receive by executing the above command will be for each UI application the application name, the publisher, the architecture, the version number, the full application name, the installation location and several other information. But if you want a list with only the name of all UI applications then give the following command:
Get-AppxPackage | Select Name, PackageFullName
From the list of applications you have installed on your system you can hide for the current user, any application you want, using the following command: Get-AppxPackage -name “PackageName” | Remove-AppxPackage and putting where PackageName the name of the application. Note that PackageName can accept wildcards (such as *) and typing * Zune * will then hide the application named "Microsoft.ZuneMusic".
Without the use of wildcards see below, as an example, how to enter one of the following commands in PowerShell and which will hide the corresponding application you are entering.
Get-AppxPackage -name "Microsoft.ZuneMusic" | Remove-AppxPackage
Get-AppxPackage -name "Microsoft.Music.Preview" | Remove-AppxPackage
Get-AppxPackage -name "Microsoft.XboxGameCallableUI" | Remove-AppxPackage
Get-AppxPackage -name "Microsoft.XboxIdentityProvider" | Remove-AppxPackage
Get-AppxPackage -name "Microsoft.BingTravel" | Remove-AppxPackage
Get-AppxPackage -name "Microsoft.BingHealthAndFitness" | Remove-AppxPackage
Get-AppxPackage -name "Microsoft.BingFoodAndDrink" | Remove-AppxPackage
Get-AppxPackage -name "Microsoft.People" | Remove-AppxPackage
Get-AppxPackage -name "Microsoft.BingFinance" | Remove-AppxPackage
Get-AppxPackage -name "Microsoft.3DBuilder" | Remove-AppxPackage
Get-AppxPackage -name "Microsoft.WindowsCalculator" | Remove-AppxPackage
Get-AppxPackage -name "Microsoft.BingNews" | Remove-AppxPackage
Get-AppxPackage -name "Microsoft.XboxApp" | Remove-AppxPackage
Get-AppxPackage -name "Microsoft.BingSports" | Remove-AppxPackage
Get-AppxPackage -name "Microsoft.WindowsCamera" | Remove-AppxPackage
Get-AppxPackage -name "Microsoft.Getstarted" | Remove-AppxPackage
Get-AppxPackage -name "Microsoft.Office.OneNote" | Remove-AppxPackage
Get-AppxPackage -name "Microsoft.WindowsMaps" | Remove-AppxPackage
Get-AppxPackage -name "Microsoft.MicrosoftSolitaireCollection" | Remove-AppxPackage
Get-AppxPackage -name "Microsoft.MicrosoftOfficeHub" | Remove-AppxPackage
Get-AppxPackage -name "Microsoft.BingWeather" | Remove-AppxPackage
Get-AppxPackage -name "Microsoft.BioEnrollment" | Remove-AppxPackage
Get-AppxPackage -name "Microsoft.WindowsStore" | Remove-AppxPackage
Get-AppxPackage -name "Microsoft.Windows.Photos" | Remove-AppxPackage
Get-AppxPackage -name "Microsoft.WindowsPhone" | Remove-AppxPackage
Hiding a pre-installed application has the advantage of hiding it from the current user who is logged in to Windows 10, without deleting it from your system. If at a later date you realize you need the app, you can reset it for the current user.
The Get-AppxPackage command can also accept the -allusers parameter to declare that it applies to all Windows users, or even the -user usename command to declare a specific user rather than the current one. That is, if you want to hide everything with a command for all users then write:
Get-AppxPackage -allusers | Remove-AppxPackage
Or if you want to hide the 1st from the above list of our application, for the user dimitris then write:
Get-AppxPackage -name "Microsoft.ZuneMusic" -user "dimitris" | Remove-AppxPackage
Delete Bloatware in Windows 10 with DISM
Do you really want to remove every piece of bloatware from your system using PowerShell? There is a different command for this: DISM. The DISM command is relatively powerful and can be used to serve a Windows system in many different ways. In this case, we will use it to remove additional applications from our system.
Deleting applications works a little differently than hiding. First, check to see the full range of bloatware using the following command:
DISM / Online / Get-ProvisionedAppxPackages | select-string Packagename
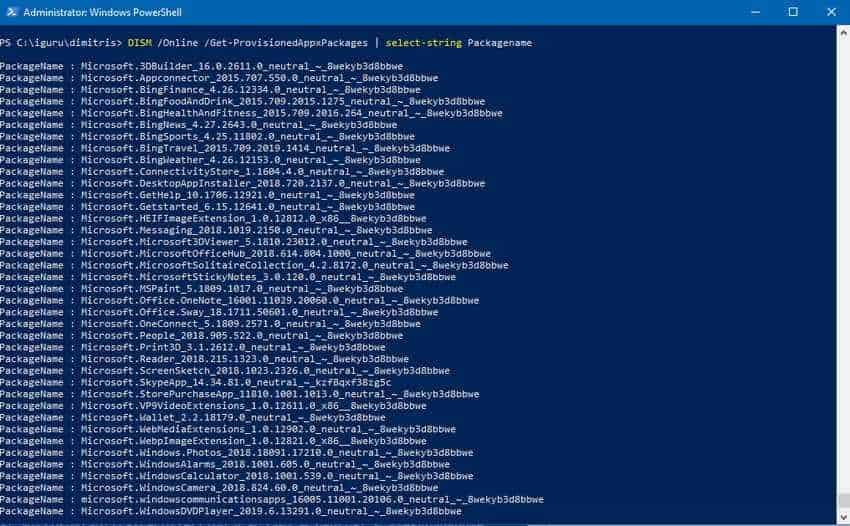
You should see a complete list of installed applications. You can now use the package names in the list to start removing. To remove them, use the following command:
DISM / Online / Remove-ProvisionedAppxPackage / PackageName: PACKAGENAME
Where PACKAGENAME gets the name of the application you want to remove from the list you created earlier. For example, if you want to remove Microsoft 3DBuilder, you must type the following command:
DISM / Online / Remove-ProvisionedAppxPackage /PackageName:Microsoft.3DBuilder_16.0.2611.0_neutral_~_8wekyb3d8bbwe
Once the process is completed successfully, you will need to restart your machine to be updated.
Delete using third-party applications
If you search the internet you will find various scripts that can make your life easier by using a graphical interface compared to PowerShell's sleek lines. As an example we mention Windows10Debloater which is a PowerShell script developed by Sycnex. However, considering the security uncertainty with the installation of a new program that aims to do the same with PowerShell, we do not recommend it and we prefer to try to hide or delete it purely through PowerShell commands.
On the one hand, this is how you learn the PowerShell commands, on the other hand, using one command at a time, you do not risk deleting them all at once (of course, no one is ever sure of the failure of each user). In addition, knowing which command you gave and which was wrong, you can easily get a recovery help from a friend by telling him exactly what you did, rather than telling him "I clicked a button in that program and it was all $% # * (".
Why remove Bloatware Apps from Windows 10?
While Windows 10 bloatware does not take up much physical space, it is more of an exercise in controlling your system. Many people think that the default applications included in the installation are "junk" and to a large extent they are right. We think that there are definitely a few applications that are interesting and useful and that are worth staying on our computer. But most applications want to disassemble as they offer nothing, you do not need them and in some, if you ever open them, you will have to watch indirect ads.
