
There is a case in one Windows μηχάνημα να μην θέλουμε οι χρήστες του να μπορούν να εκκινήσουν κάποιες εφαρμογές ή να επιθυμούμε το μηχάνημα να τρέχει μόνο συγκεκριμένες εφαρμογές. Οι λόγοι μπορεί να είναι είτε θέμα ασφαλείας ή γιατί ο υπολογιστής ανήκει σε εργασιακό χώρο κλπ. Τα Windows σας δίνουν αυτή την δυνατότητα ρύθμισης μέσα από μητρώο. Ας δούμε πως.

Before proceeding with the next steps, you should be very careful with who and for whom you are blocking them. There is a possibility to block yourself from various tools Windowssuch as processing a registry and editing a local group policy, resulting in you being without the administrator's rights. If you accidentally do so, the only way to reverse the changes is to perform System Restore. For this reason, we recommend that before you do anything you can first create a restore point for each event.
Block a user from launching specific applications by editing the registry
To block a user from certain applications by modifying the Windows registry, you must log in to your machine with the user name you want to make the changes, and then edit the registry while logged into your account. If you have multiple users for whom you want to make changes, you must repeat the process for each user.
Step 1: Log in to Windows with the user account you want to make the changes.
Step 2: Open Registry Editor. If you do not know how then press the Win + R keys at the same time and in the "Execute" window that appears write the word "regedit" and press the OK key.
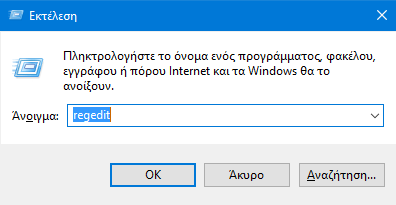
Step 3: If you are asked to allow this application to make changes to your device, say "Yes"
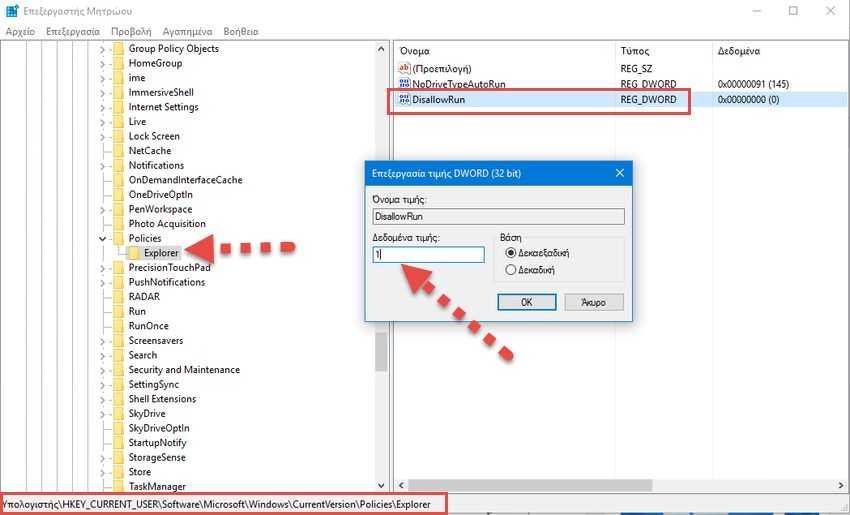
Step 4: In the registry editor, navigate to the following key:
HKEY_CURRENT_USER \ SOFTWARE \ Microsoft \ Windows \ CurrentVersion \ Policies
Step 5: In Policies, create a new subkey called Explorer. If you do not know how, right-click in the right pane and select Create> Key. If the key already exists simply ignore this step.
Step 6: Inside the new "Explorer" key create a DWORD value (32 bit) named DisallowRun. If you do not know how, right-click in the right pane and go to Create> DWORD Value (32 bit). Select 32 bit even if you are running 64 bit Windows.
Step 7: Double-click the new DisallowRun value to open its properties dialog. Change the value in the "Value data" box from 0 to 1, and then click "OK".
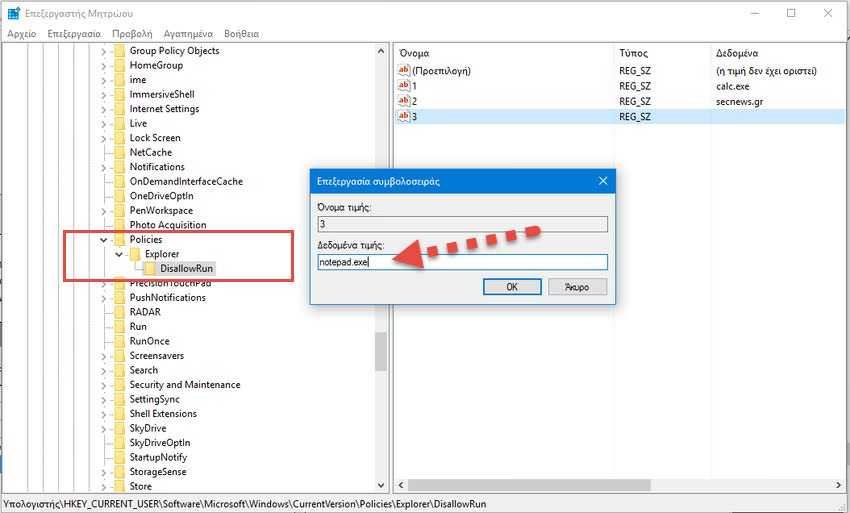
Step 8: Return back to the Explorer key and create a new key (a key rather than a DWORD value) named DisallowRun (same name as the previous DWORD value).
Step 9: Now it's time to start adding the applications you want to block. This is done by creating a new "string value" inside the DisallowRun key for each application you want to block. Right-click the DisallowRun key, and then select Create> String Value. Name these values with prime numbers, so that the name of the first value you create is "1", then "2" and so on.
Step 10: Double-click the new value (named 1) to open its edit window and type in the value data the name of the executable file you want to exclude (eg, calc.exe), and then click on the "OK" button.
Step 11: Repeat this process for steps 9 and 10, naming the second string value "2", the third string "3" and so on, and then adding the names of the executable files that you want to exclude in the value data of each string.
Step 12: When done close the registry editor (changes will be saved automatically) and rebootmovement of Windows. Log in with that user account and test if you can run each of these apps. You should see a pop-up restriction window informing you that you cannot run the application.
Repeat all the above steps for each user account for which you should block apps. However, if you block out the same applications for multiple user accounts, you could export the DisallowRun key that you created and configured the first user account, and then import it into each subsequent account.
If you want to restore access to all applications, you can either delete the entire Explorer key that you created, along with a DisallowRun subkey as well as all values. Or you could just go back and change the value of the DisallowRun value you created from 1 to 0, leaving the list of apps in the registry in case you want to activate it again in the future.
Allow a user to only start some applications by editing the registry
In relation to the first section of this article, the second section will show you how to block ALL applications from a particular user and allow it to access only certain applications that you set them by editing the registry.
Access to specific applications follows almost exactly the same procedure as module one.
Step 1: Log in to Windows using the user account you want to change.
Step 2: Open Registry Editor. If you do not know how, then press the Win + R keys at the same time and in the "Execute" window that appears type the word "regedit" and press the OK key.
Step 3: If you are asked to allow this application to make changes to your device say "Yes"
Step 4: In the registry editor, navigate to the following key:
HKEY_CURRENT_USER \ SOFTWARE \ Microsoft \ Windows \ CurrentVersion \ Policies
Step 5: In Policies, create a new subkey called Explorer. If you do not know how, right-click in the right pane and select Create> Key. If the key already exists simply ignore this step.
Step 6: Inside the new "Explorer" key create a DWORD value (32 bit) named RestrictRun. If you do not know how, right-click in the right pane and go to Create> DWORD Value (32 bit). Select 32 bit even if you are running 64 bit Windows.
Step 7: Double-click the new RestrictRun value to open its properties dialog. Change the value in the "Value data" box from 0 to 1, and then click "OK".
Step 8: Return back to the Explorer key and create a new key (a key rather than a DWORD value) named RestrictRun (same name as the previous DWORD value).
Step 9: Now it's time to start adding the apps that o user will be able to access. This is done by creating a new “string value” inside the RestrictRun key for each app you want to grant access to. Right-click the RestrictRun key, then select New > String Value. Name these values with simple numbers, so the first value you create is named “1”, then “2”, and so on.
Step 10: Double-click the new value (named 1) to open its edit window and type in the value data the name of the executable file you want to access (eg, notepad.exe), and then click click the "OK" button.
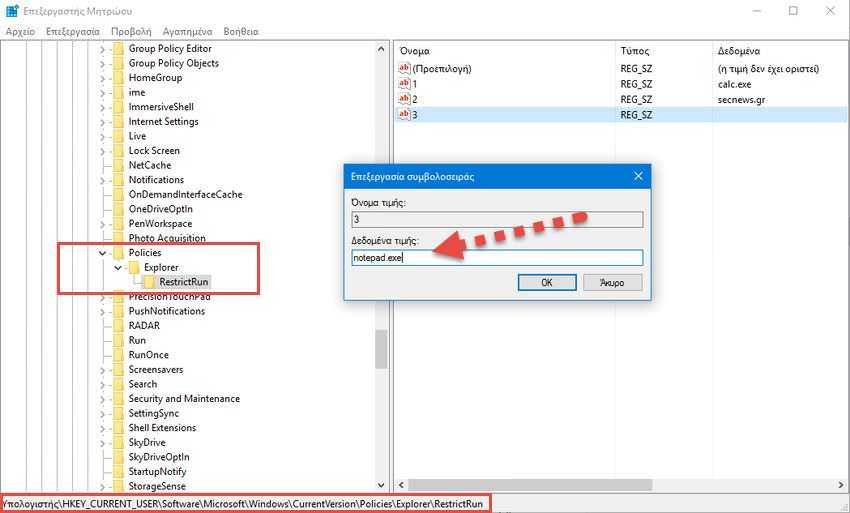
Step 11: Repeat this process for steps 9 and 10, naming the second string value "2", the third "3" and so on, and then adding the names of the executable files you want the user to access, to the value data of each string. .
Step 12: When finished, quit the registry editor (the changes will be automatically saved) and restart Windows. Log in to this specific user account and test if you can run each of these apps as well as another one you did not specify in step 11. It should be able to execute ONLY the applications you have assigned to it and in the others to see a pop-up restriction window that will let you know that you can not run the application.
You will need to repeat the process with each user account that you only want to access to certain applications. But if you have to do the same work on multiple user accounts, you could export the RestrictRun key that you created and configured the first user account and then import it into each subsequent account.
If you want to restore access to all applications, you can either delete the entire Explorer key that you created, along with a RestrictRun subkey and all values. Or you could just go back and change the value of the RestrictRun value you created from 1 to 0, leaving the list of applications in the registry in case you want to re-enable it in the future.
Windows Pro and Enterprise: Block applications with the local group policy editor
If you use the Windows Pro or Enterprise versions, you can block access to specific applications to a user in a much easier way by using the Local Group Policy Editor. A big advantage is that you can apply the policy settings to other users, or even user groups, without having to log in as each user individually to make changes for that user.
The warning here is that you should make a small extra set-up from the first by creating a policy object for users. You can read all about that in our guide to applying local group policy tweaks to specific users. You should also know that the political group is a very powerful tool, so it's worth taking a moment to find out what it can do.
Also, if you are on a network for example your company, check the changes you want to make with your administrator first. If your work computer is part of a domain, then it is most likely that it is part of a domain group policy that has replaced the local group policy anyway.
The process to allow or restrict some applications through the local group policy editor is almost identical, so we'll show you how to restrict users from running only some apps by pointing out the differences for the second case.
Step 1: Sign in to Windows with any user account you want.
Step 2: Open the Local Group Policy Editor. If you don't know how, then press the Win + R keys at the same time and in the "Run" window that appears, type the word "gpedit.msc” and press the OK key.
Step 3: If you are asked to allow this application to make changes to your device say "Yes"
Step 4: For security reasons in our example we will change the application restrictions policy to all non-administrator user accounts. In the left pane of ¨ Local Computer,, navigate to User Settings> Management Templates> System.
Step 5: In the right pane, find the "Do not run only specific Windows applications" setting and double-click it to open its properties window. If you want to block ALL applications and allow only specific ones to run, open "Run only specific Windows applications" instead.
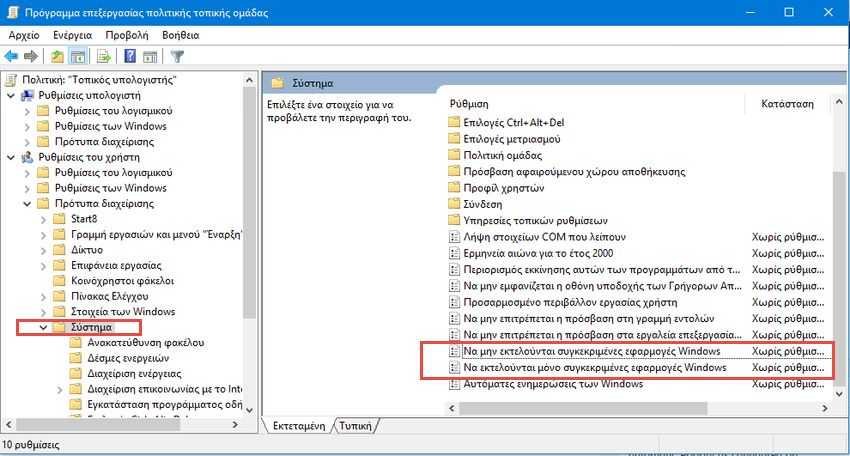
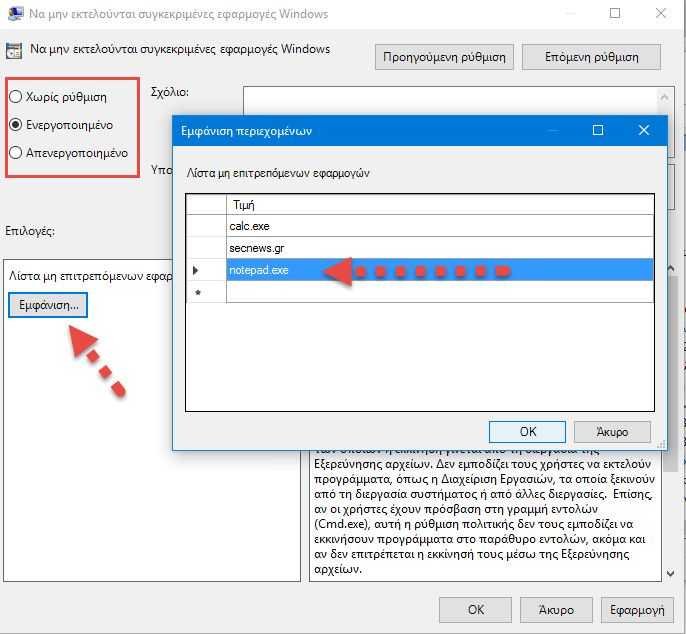
Step 6: In the properties window that just opened, click "On" and then click "Show".
Step 7: In the new Content View window, click each line in the list and enter the name of the excecutable file that you do not want users to be able to run (or the name of the applications you want to run if you set the second option). When you have finished completing your list, click "OK".
Step 8: Exit the Local Group Policy window. To check your changes, sign in with one of the affected user accounts and try to start an application that the user will not be able to access. Instead of starting the application, you should see an error message.
If you want to turn off your changes, just reopen the Local Group Policy Editor, go to the setting you previously "teased" and select "Off" or "Unset". Click OK and Windows will return to its original state. The list of applications is left in the submenu so you can restrict access whenever you want.
