
If Windows 10 has corrupted files, you can use Command Prompt's DISM and SFC commands to fix the problem. Let's see the way.
What is the DISM command
In Windows 10, Deployment Image Servicing and Management (DISM) is a tool that allows administrators to prepare, modify, and repair their system images, including Windows Recovery Environment, Windows Setup, and Windows PE (WinPE). You can also use it with local recovery image to fix problems systemic.
The DISM command usesto manage Windows distribution images and perform various operations on those images, such as system repairs and upgrades. With this command you can perform various functions, such as:
- Repair distribution images
- Enable or disableactivation Windows features such as management operation
- Add or remove update packages
- Creating custom Windows distribution images
Below are some examples of DISM commands:
Repair system files on a Windows partition image: dism / online / cleanup-image / restorehealth
Adding an update package to a Windows distribution image: dism /online /add-package /packagepath:C:\Updates\ExamplePackage.cab
Creating an abandoned system file on a Windows partition image: dism /online /export-image /sourceimagefile:C:\Install.wim /sourceindex:1 /destinationimagefile:C:\Example.wim
Usually, when you need to troubleshoot a specific error, find out why the computer no longer boots properly, or resolve performance issues, you can use the System File Checker (SFC) tool to replace missing or damaged system files using the image recovery.
The only caveat using this approach is that if one or more Windows 10 files in the local image are corrupted, the SFC command will not work.
In this scenario, you can use the “install.wim” image file with DISM to repair the image, and then use the SFC tool to repair the installation without having to reinstall Windows.
This how-to guide walks you through the steps to use the DISM and SFC tools to restore your computer to a healthy working state without the need for a reinstall.
Warning: The commands described in this guide are not destructive, but since you will be making changes to the system, it is recommended that you create a temporary full backup before proceeding.
Repair a Windows 10 image with DISM

The DISM command tool includes three options for repairing an image, including “Check Health","ScanHealth" and "Restore Health", which you must use in the above order.
Also, depending on the problem, you can use the “RestoreHealth” option to fix the locally available image using different source files.
Check Health
The CheckHealth option with the DISM tool allows you to identify any corruption within the local Windows 10 image. However, the command does not perform repairs.
To check your Windows 10 image for DISM issues, follow these steps:
Step 1: Open a Command Prompt window with administrator rights. If you don't know how, type cmd in Search and in the result “Command Prompt, application” right click and select Run as administrator.
Step 2: Type the following command to run a quick check and press Enter:
DISM /Online /Cleanup-Image /CheckHealth
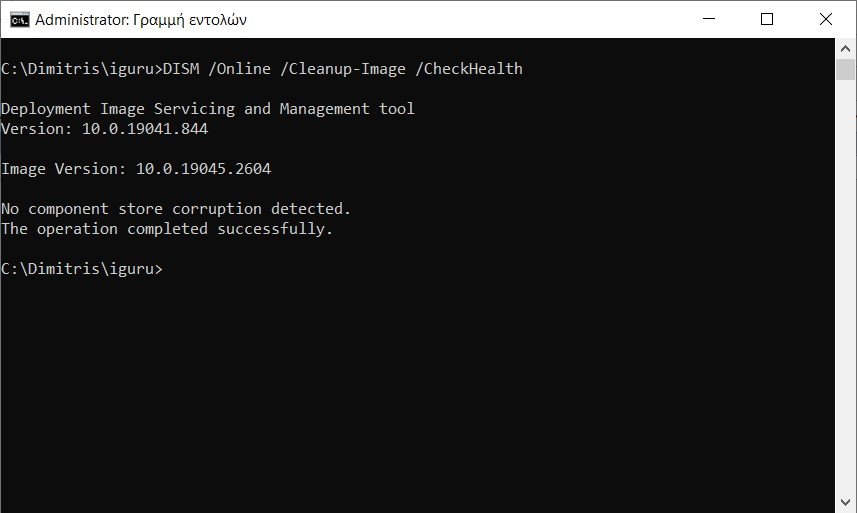
Once you complete the steps, the Deployment Image Servicing and Management tool will run and verify any data corruption that may require repair.
ScanHealth
The ScanHealth option does a more advanced scan to determine if the image has problems.
To check for image problems with the ScanHealth option, follow these steps:
Step 1: Open a Command Prompt window with administrator rights. If you don't know how, type cmd in Search and in the result “Command Prompt, application” right click and select Run as administrator.
Step 2: Type the following command to run an advanced DISM scan and press Enter:
DISM /Online /Cleanup-Image /ScanHealth
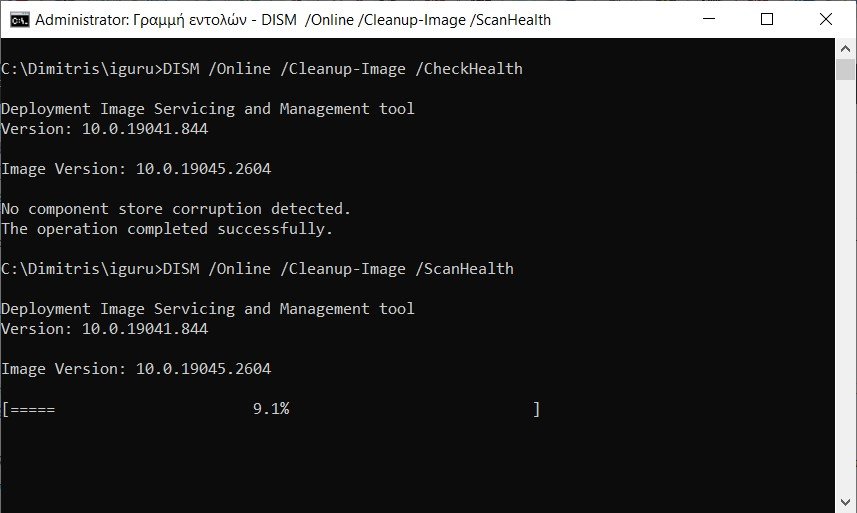
This scan may take several minutes to check if your Windows 10 image needs repair.
Restore Health
If there are problems with the system image, use DISM with the RestoreHealth option to automatically scan and repair common problems.
To repair Windows 10 image problems with the DISM command tool, follow these steps:
Step 1: Open a Command Prompt window with administrator rights. If you don't know how, type cmd in Search and in the result “Command Prompt, application” right click and select Run as administrator.
Step 2: Type the following command to repair Windows 10 image and press Enter:
DISM /Online /Cleanup-Image /RestoreHealth
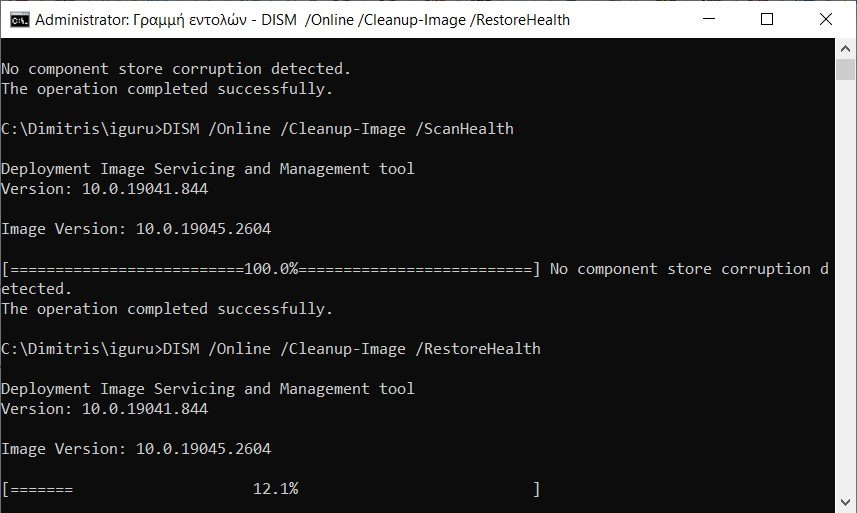
Note: If the command appears stuck, this is normal behavior. After a few minutes, the process will complete successfully.
Once you've completed the above steps, DISM will connect to Windows Update online to download and replace damaged files (if needed).
Repairing a Windows 10 image with DISM and the install.wim image
The Deployment Image Servicing and Management commands usually do not cause problems. However, if the tool detects problems replacing the damaged files or the computer is not connected to the Internet, you will need to provide another image using the Source.
Usually, you can use an “install.wim” or “install.esd” file from another device, or bootable installation media, or a Windows 10 ISO file. You just need to make sure the files match the version and the language of the version of Windows 10 you are trying to fix.
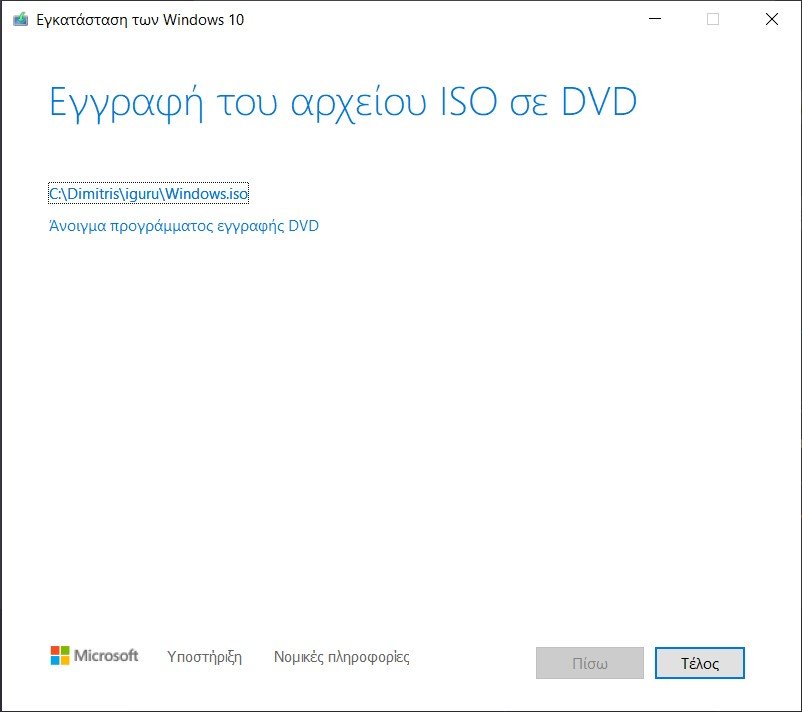
If you must use another file source, it is recommended that you use the Media Creation Tool to download a fresh copy of Windows 10.
To download Windows 10 ISO file, follow these steps:
Step 1: Open this site its support Microsoft.
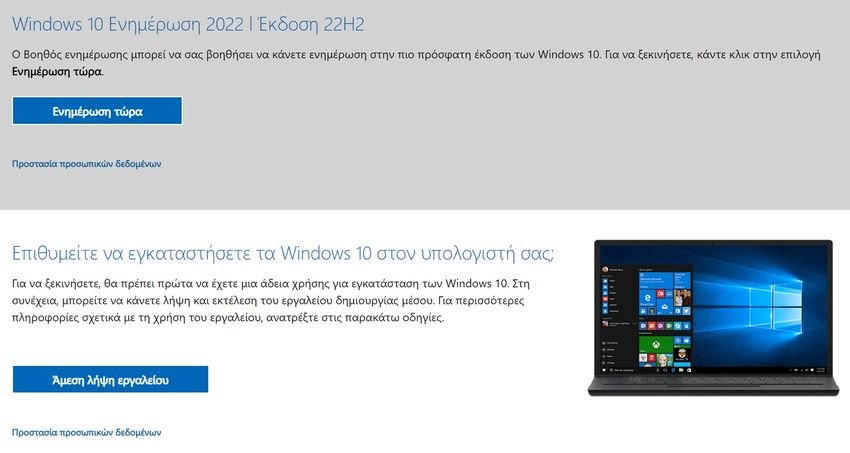
Step 2: Click on “Download Tool Now” button. Assign it a folder on your disk and click the Save button to save the media creation tool.
Step 3: Run the MediaCreationToolxxxx.exe file to start the setup
Step 4: At the question “Do you want to allow this app to make changes to your device” say “Yes”. In the new window, click the “Accept” button to agree to the terms.
Step 5: Select “Create installation media (USB flash drive, DVD or ISO file) for a different computer”.
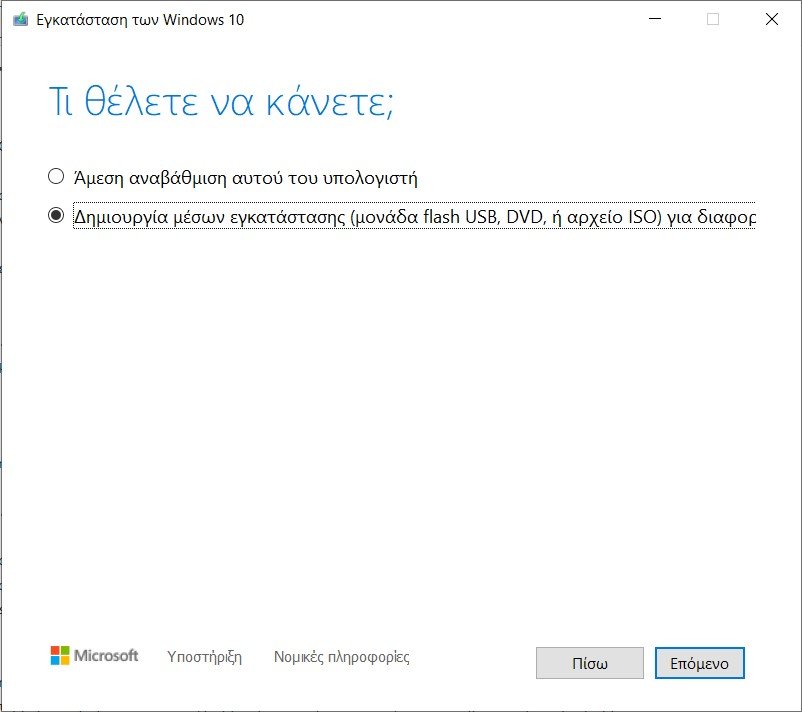
Step 6: Click the Next button.
Step 7: Select language, architecture and version
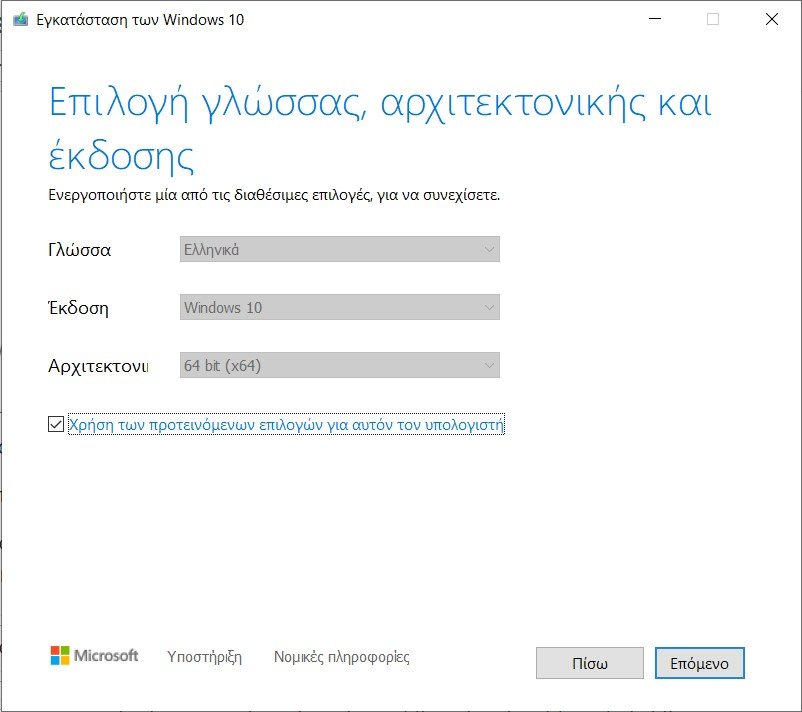
Step 8: Click the Next button.
Step 9: At the “Choose the media to use” prompt, select “ISO File”. Click Next.
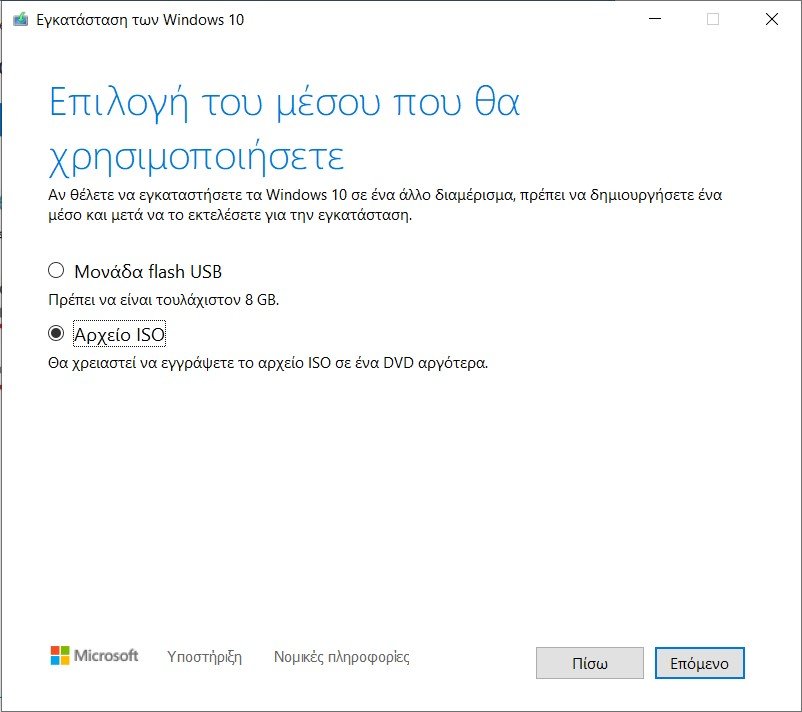
Step 10: Select the save folder on your disk and click the Save button.
Step 11: Click the link to open the file location with File Explorer.
Step 12: Click the Finish button.
Step 13: Double-click the Windows.iso file to mount the image to your computer's virtual disks.
Step 14: In the “This PC” section, see what the drive letter is for the mount point.
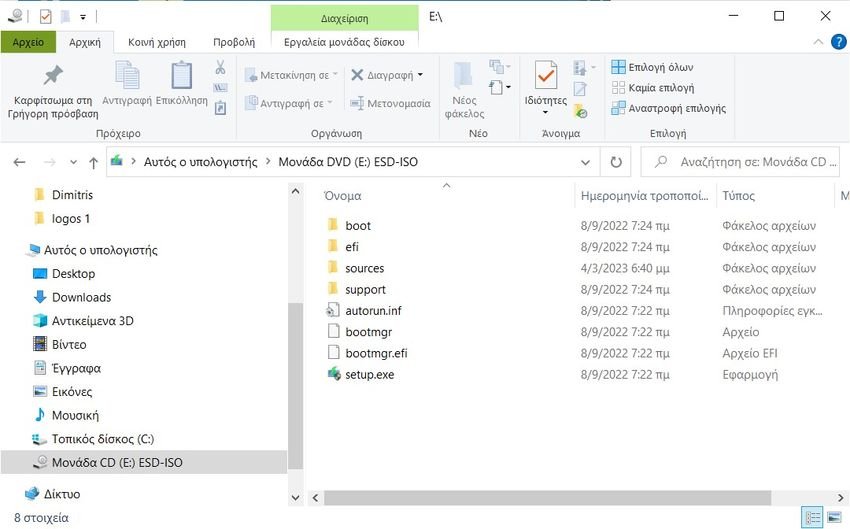
After completing the above steps, you can proceed with the DISM tool using the “Source” option to repair the local image.
Fix Windows 10 recovery image through another source
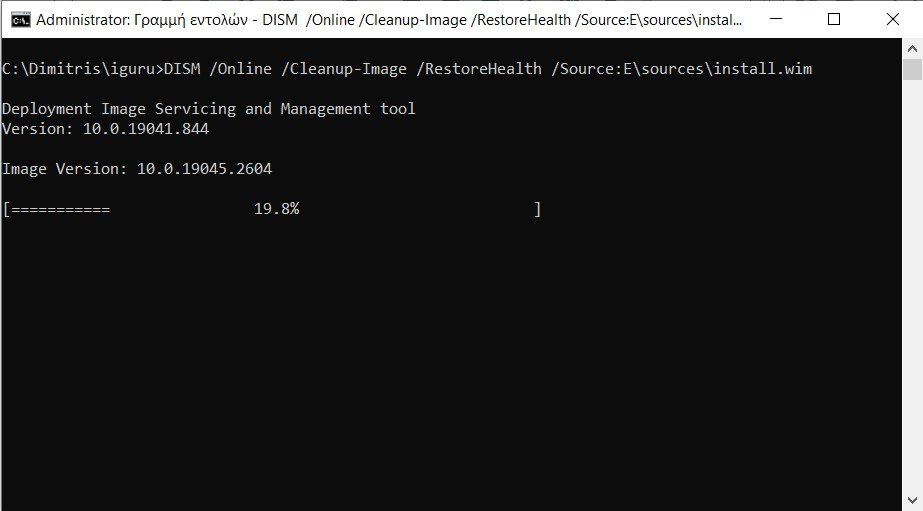
To run the Deployment Image Servicing and Management tool with an alternate source image (install.wim), follow these steps:
Step 1: Open a Command Prompt window with administrator rights. If you don't know how, type cmd in Search and in the result “Command Prompt, application” right click and select Run as administrator.
Step 2: Type the following command to repair Windows 10 image and press Enter : DISM /Online /Cleanup-Image /RestoreHealth /Source:E\sources\install.wim
In the command, replace “E” with the ISO mount point drive letter in File Explorer.
Optional: Type the following command to restrict the use of Windows Update and press Enter : DISM /Online /Cleanup-Image /RestoreHealth /Source:E\sources\install.wim /LimitAccess
Optional: Type the following variation of the previous command to accomplish the same task and press Enter : DISM /Online /Cleanup-Image /RestoreHealth /Source:wim:Ε:\Sources\install.wim:1 /LimitAccess
In the command, change “G:\Sources”, for the path to the “install.wim” file.
Once you complete the steps, the command will scan and fix the problems using the “install.wim” file you specified as an alternate source.
Fix problems with DISM using ESD image

If you have an encrypted “install.esd” image, it is possible to use it to repair damaged files in Windows 10.
To use DISM with an “install.esd” image file as a source to repair Windows 10, follow these steps:
Step 1: Open a Command Prompt window with administrator rights. If you don't know how, type cmd in Search and in the result “Command Prompt, application” right click and select Run as administrator.
Step 2: Type the following command to repair the image with an “install.esd” file and press Enter : DISM /Online /Cleanup-Image /RestoreHealth /Source:C:\ESD\Windows\sources\install.esd
In the command, replace “C:\ESD\Windows\sources” with the path to the location of the “.esd” file (if different).
Optional: Type the following command to restrict the use of Windows Update and press Enter : DISM /Online /Cleanup-Image /RestoreHealth /Source:C:\ESD\Windows\sources\install.esd /LimitAccess
Optional: Type the following variation of the previous command to accomplish the same task and press Enter : DISM /Online /Cleanup-Image /RestoreHealth /Source:esd:C:\ESD\Windows\sources\install.esd:1 /LimitAccess
Optional: Type the following command to use an install.esd file located on another drive and press Enter : DISM /Online /Cleanup-Image /RestoreHealth /Source:E:\Sources\install.esd
In the command, replace “E:\Sources” with the path to the location of the “install.esd” file.
After completing the steps, the tool will repair the damaged files using the files included in the “install.esd” image.
Fix Windows 10 problems with SFC

The instructions above will fix system image problems, not Windows 10 installation problems. After restoring the image to a healthy state, use the command tool System File Checker to fix the current setting.
To use the SFC command tool to fix Windows 10 problems, follow these steps:
Step 1: Open a Command Prompt window with administrator rights. If you don't know how, type cmd in Search and in the result “Command Prompt, application” right click and select Run as administrator.
Step 2: Type the following command to repair the installation and press Enter : SFC /scannow
Tip: If errors are found, run the command about three times to make sure everything is fixed correctly.
Once you complete the steps, the SFC tool will repair the system files using the local image files and the logs will be saved in “%windir%/Logs/CBS/CBS.log” and “%windir%\Logs\DISM\dism .log”, which you can view to get more details about the process.
