
Looking for an inexpensive way to boost the performance of your Windows 10 PC? You have one unit USB flash drive and a spare USB port on your computer? Then Windows ReadyBoost might be a perfect solution for you.
What is ReadyBoost?
The ReadyBoost is a mysterious Windows 10-launched Vista feature that caches files to a USB flash drive or SD memory card, using it as a cache. In short, as Microsoft says, it has a purpose improve the performance of your old computer without opening it and adding more memory (RAM).
How does it work
The need arose with the entry of Vista which required more RAM (2GB) than the earlier XP (512MB or 1GB). In case of lack of memory then the hard disk is used as virtual μνήμη, για την αναπλήρωση της. Φυσικά ο σκληρός disc it is much slower than the computer's memory, but at least the machine "raises" the demanding operating system.
Microsoft had the brilliant idea that since flash memory has better speeds and much shorter seek time than a simple mechanical hard drive, then for random files using memory instead of disk will speed up the process.
ReadyBoost also uses a service that appeared in Vista called SuperFetch. SuperFetch uses an algorithm to determine which files you use over and over again and prepares them in cache. The cache can include system files, application files, and user documents.
When Windows 10 needs access to any of these frequently used files, it goes to ReadyBoost Cache instead of the drive. If a file changes to the drive, it also changes to cache and vice versa.
Requirements
It is now recommended for desktops to use only USB flash drives for ReadyBoost. You can use a USB 2 or USB 3 port, but since a USB 3 port has a faster transfer rate, it is preferable. You can also use an SD memory card for a laptop, as long as it has a fairly fast transfer rate.
Of course you can use more than one USB flash drive for ReadyBoost. The recommended ratio between ReadyBoost Cache and Ram System Memory is 1: 1 to 2,5: 1.
So if your computer has 8 GB of memory, you can create a ReadyBoost cache between 8 GB and 20 GB. But you can use a 32 GB flash drive and make it available in ReadyBoost.
Note that ReadyBoost was developed for use with hard drives (HDDs) and not Solid State (SSD) drives. Hard disks are known to have slower read and write times than SSDs. If you have Windows on an SSD and request the use of ReadyBoost, Windows will most likely prevent you.
If you have a physical RAM of 4 GB, then ReadyBoost is probably useless because this memory exceeds the requirements of Windows. Basically, the ReadyBoost function is aimed at old computers, 10 years old and older.
ReadyBoost Requirements for Windows 10
- Minimum free space per flash drive / memory card: 1 GB
- Maximum free space per flash drive / memory card: 32 GB
- Minimum transfer rate: 3,5 Mbit / s.
- Flash drive / memory card format: NTFS
To make sure your computer is ready to use ReadyBoost, you need to make sure that SuperFetch (Windows 10 version 1803 or later) or SysMain (Windows 10 version 1809 or later) is running. To check the status of the SuperFetch / SysMain service, follow these steps:
1. Open a Run dialog box. If you do not know how, just press Win + R at the same time.
2. In the Open field, type services.msc, and then click OK.
3. Scroll down the list of services until you find SuperFetch or SysMain
4. Make sure it is running (running) and set to start automatically.
You are now ready to set up a USB flash drive or SD memory card for use with ReadyBoost. Simply insert the drive into a spare USB port or SD card slot and follow the instructions below.
How to enable or disable ReadyBoost in Windows 10
1. Insert the USB flash drive or SD memory card that you want to use with ReadyBoost.
2. Open File Explorer and go to the "This Computer" section. We do not imagine that you do not know how to open an exploration, but if so, just press Win + E. at the same time.
3. Right-click the USB flash drive or SD memory that you want to use as ReadyBoost.
4. From the context menu that appears, left-click Properties.
5. In the Properties dialog box, left-click on the ReadyBoost tab.
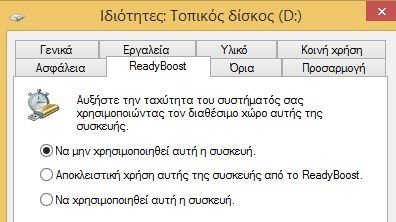
6. Once the system has analyzed the drive, select "Use the device", and set the options you want to use.
ReadyBoost settings
In step 6 above you can set how many Gigabyte from the device you want to use for ReadyBoost.
If you have formatted the flash in FAT32, then you can only use 4GB (1GB=1024MB), due to system limitations files. If you formatted it in NTFS or exFAT, the limit is 32GB.

If possible, keep the ReadyBoost: Ram ratio at 1: 1 or at most 2,5: 1.
Finally press the OK button and you are ready. You will see a new ReadyBoost file in the bottle. Of course the USB Flash Drive will now have to stay connected forever, or at least for as long as you want to use this feature.
In conclusion
ReadyBoost will increase the speed of your old computer, with the logic that you do not want to waste money or screw your computer. The solution of buying an SSD to install Windows on it, or even buying additional RAM will do a much better job.
