Changing your DNS settings can have a big impact on your daily internet speeds and save you from your ISP bans. See how you can change the DNS settings correctly.

Over the past two decades, technological advances have dramatically improved internet speeds. Broadband and fiber connections have created lightning fast networks where even video high definition images can be loaded within minutes.
This does not mean that there is no room for improvement. Changing your DNS settings is often cited as one of the easiest ways to optimize your internet speed. It can also bypass your provider's prohibitions, if he accepts an order from the EDPPI. Well, let's take a look at how DNS works and how to change DNS settings.
What is DNS?
When you enter a website's URL into the program of your browser, this must be translated into the IP address of the website to send and receive data. The Domain Name System (DNS) is the digital equivalent of a telephone directory, providing a number (IP address) for a given name (URL).
For example, if you enter www.iguru.gr in your browser, the DNS server translates it to an IP address, for example to 188.114.96.5. With over one billion sites currently online, it is not practical to maintain such a long list. Instead, the DNS server stores a cache for a number of shared sites.
If you try to access a site that is not already cached, your DNS server will ask you to register from another server.
The default DNS server that you have is likely to be provided by your ISP and is not guaranteed to be the most efficient server.
And a little technology

The infrastructure that the internet supports is a series of copper and optical cables that connect servers around the world. Data is transmitted to these cables in the form of electromagnetic waves, at speeds limited to the speed of light. Although there is nothing we can do to increase this speed, we can reduce the distance these waves have to travel.
If a DNS server is far away from you, then your browsing speeds will be affected. However, the reality of the internet is more complicated than you think with simple distance calculations.
Take for example Google Public DNS, which is one of the most popular DNS server alternatives and uses two IP addresses (8.8.8.8 and 8.8.4.4).
These are known as anycast addresses, with many servers around the world responding to requests from these addresses. The servers respond to user requests, which vary during the day, depending on network conditions and traffic. Despite a lot of query traffic from all over the world, it is consistently ranked as one of the fastest DNS servers.
They did this by working with Content Delivery Networks (CDNs) to attach location data to DNS requests. This way the data is loaded from a local server to you, improving your overall internet speed.
Does changing your DNS speed up?

When planning a trip with Google Maps, you are presented with many different travel options. Some of the routes will take less time, even if they travel longer distances. This can be due to many factors such as traffic, transport changes and average speed.
When choosing a DNS server to increase your internet speed, you will be faced with a similar range of factors. Choosing the most advantageous route is known as route optimization. Some DNS servers, such as those provided by ISPs, will be busy, especially during peak hours.
Some servers have outdated records or inefficiently route your data. The complex interaction between servers and connections makes route optimization an integral part of improving your internet speeds. Your ISP DNS server may be nearby. However, their approach to "suit everyone" is unlikely to give you the best performance.
A tool like Google Namebench. It is portable and offers a free speed test to help you find the fastest DNS to optimize your internet speed. Namebench analyzes your connection and suggests the best DNS servers that are explicitly tailored to you.
How to change DNS settings
While your ISP probably has its own DNS server, it is probably not the fastest option available. Instead, you will want to change the DNS settings of your operating system. There are three top alternative DNS providers: Google DNS, OpenDNS and Cloudflare DNS.
The first logical thought is to change the DNS setting on your router and not on your computer. This way you will have the desired DNS on all your network devices coming out of the internet from this router. Just as you understand it: your network. However, when you connect to a laptop, mobile tablet, etc. via WiFi to another network, then you do not have to set up that network there. Unless you have already set up your own device.
How to change DNS settings in Windows 10 and 11

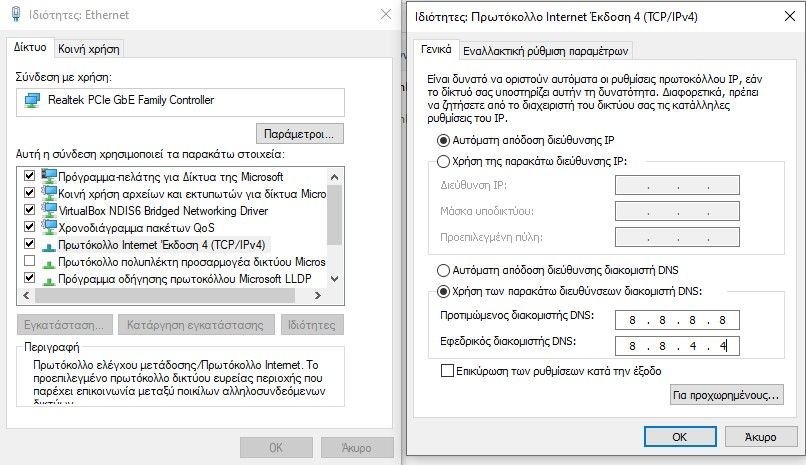
To change your DNS in Windows 10 and 11, go to Control Panel> Network & Internet> Network & Sharing Center and click Change adapter settings on the left side.
This opens a list of all available network devices. You will connect to the internet either through a wired port Ethernet or via a Wi-Fi adapter. Depending on your settings, right-click the device connected to the internet and select Properties.
Highlight the option labeled “Internet Protocol Version 4 (TCP / IPv4)”And click on“Properties”(Properties). Go to “Use the following DNS server addresses".
Enter the following IP addresses in this area, depending on the DNS provider you want to use:
- Google DNS: 8.8.8.8, 8.8.4.4
- Cloudflare IPv4: 1.1.1.1, 1.0.0.1
- OpenDNS: 208.67.222.222, 208.67.220.220
Once logged in, click OK to save these settings. You will return to the Properties menu. From here, select “Internet Protocol Version 6 (TCP / IPv6)”And click on“Properties”. You can now repeat the process for IPv6 DNS servers.
- Google DNS: 2001:4860:4860::8888, 2001:4860:4860::8844
- Cloudflare IPv6: 2606:4700:4700::1111, 2606:4700:4700::1001
- OpenDNS: 2620:119:35::35, 2620:119:53::53
Click OK to save the IPv6 DNS settings. You can then close all configuration windows and return to your normal Internet browsing. After you click to confirm these settings, you will start using the new DNS servers.
How to change DNS settings on an iPhone
Suppose you want to change the DNS server on an iPhone, open them Settings> Wi-Fi . Click the icon ” i ”Next to your connected network. This will open a settings page for the wireless network you want to customize. Scroll through the page until you reach the DNS header.
Press the option DNS configuration . By default, this is set to Automatic. Select Manually to enable further options. The field Personcase server will appear below the DNS server. Press the button and enter the IP address of the desired provider. When done, press Storage in the upper right corner of the screen.
How to change DNS settings on Android
The steps to change your DNS on Android vary depending on your device. However, for an Xiaomi Redmi Note Pro 9 with MIUI 12, which is based on Android 11, open Settings> Connection & Sharing> Personal DNS.
There click on Personal Name DNS benefits and here, you will need to use the hostname of the DNS server instead of the IP address as below.
- Google DNS: dns.google.com
- Cloudflare: 1dot1dot1dot1.cloudflare-dns.com
If you are on Android, you should log in to Settings> Network & Internet. Click the arrow to expand the Advanced Settings. Select the Private DNS field and an import window will open. Click Private DNS Central Provider Name and enter the above.
The need for DNS speed
Although there is no golden rule for improving internet speed, you can make many small modifications and improvements. These improvements will eventually work together to increase your overall internet speed.
The DNS server you choose will play a key role in this process.


Very good article and informative.
Did I happen to have the Android phone you use for example in the article?