
See how to add or remove the network icon on the home screen or lock screen in Windows 10.
![]()
By default Windows 10, when users are in the home screen or lock screen, they can see and manage the network icon, with the ability to disconnect the computer from the network or connect it to other available networks without having to be connected first. in Windows. In short, anyone sitting in front of your computer can disconnect from the network without even being a user of that computer.
For some reasons this feature may not be convenient for some users and they may want to disable it. This article will show you how to add or remove the network icon from the lock screen and login screen for all Windows 10 users. You must be logged in as Admin to proceed with the following actions.
A Mode: Using Group Policy
Note. Local Group Policy is only available in Windows 10 Pro, Enterprise, and Education. All other versions can only use the B way.
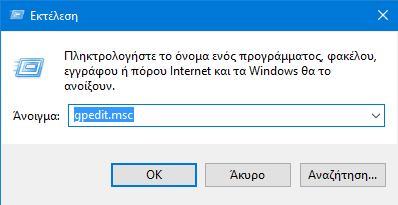
1. Open the Local Group Policy Editor. To do this, press the Win + R keys at the same time, and in the Run window, type gpedit.msc and press OK.
2. In the left pane of the Local Group Policy Editor window, go to: Computer Settings> Administration Templates> System> Login
3. In the right pane of the Local Group Policy Editor login window, double click in “Do not show network selection interface” option to edit it.
![]()
4. Select the "On" option to NOT display the icon or if you wish otherwise select the "Off" option to display. Its initial "Unset" option is Off and the network icon is displayed.
![]()
5. Press the OK button to save your selection
6. When you are finished, you can close the Local Group Policy Editor.
B Mod: modifying the registry
1. Open the registry editor. To do this press the Win + R keys at the same time and in the execution window type regedit and press the OK button. If Windows asks you if you want to allow this application to make changes to your computer, click "Yes".
2. go to key:
HKEY_LOCAL_MACHINE \ SOFTWARE \ Policies \Microsoft\ Windows \ System
3. Right-click in the right window of the Registry Editor and select Create> DWORD Value (32 bit).
4. Rename the "New Value # 1" you just created to "DontDisplayNetworkSelectionUI"
5. Right-click on the new value you created with the name DontDisplayNetworkSelectionUI and give it the 1 number as the data value (Base: hexadecimal).
![]()
6. Press the OK button and close the registry editor. The save will be done automatically.
7. You're done. The icon will no longer appear. If you want to reappear it simply delete the DontDisplayNetworkSelectionUI value you created earlier.
