
See how you can easily turn your home computer into a server and set up your own personal website with the VirtualBox program.
Hosting a website on a server costs money. Although there are some minimal free solutions, they are governed by very high restrictions that probably make them more of a learning game than building a serious website.
Alternatively you could use your home computer to host and share on the internetnetwork your website, but also any other website you manage.
What you need to have
a. Symmetrical connection
The requirements to do something like this are not few, but they are not impossible either. First of all you should have a fast, symmetrical internet connection.
Although Greece lags behind in terms of connections, fiber optic technology has already begun to grow. Typical speeds remain at 200/20 Mbps for download and upload respectively, which lags behind web hosting, as 20 mbps is too little for that.
However, Athens and Thessaloniki already have 100/100 mbps connections from Inalan, at a low price, without an upper data limit, and could very well be used for a server infrastructure.
b. Static IP
Of course you will need a static IP, i.e. a fixed IP that your provider will provide you. Static IP is expensive, so most people connect to a dynamic IP.
In dynamic IP the provider can change IP number without any warning and as often as they want. However, most providers leave the same IP for a long time (even months) and do not change it.
If you find that your IP changes frequently, then you can use it free no-ip service, which takes care of giving you its own subdomain, which will be connected to the respective IP of your machine.
In other words, there will be a sub-domain on the internet that can lead anyone directly to your router.
c. A good machine
Now if you try to set up a server on a 10 year old machine with 4 GB Ram and 4 cores you will probably be disappointed. The requirements for a good machine that will do your job decently are to have at least:
- 16 GB Ram
- 12 cores
- Excess hard disk space
- A small ups so that it doesn't go out with the slightest interruption of the PPC
And of course this is all about what page you want to set up and what resource consumption it will require. A forum for example, or a social media that will have many requests probably needs an even better machine.
d. A Virtual Machine program
These programs are free and pretty decent. You can try VMWare, Hyper-V (by Microsoft), VirtualBox, QEMU and some others.
We will recommend VirtualBox because apart from being completely free, even in its full version, it is quite easy to use with a very good interface.
e. A free server management program
For ssh connoisseurs, this step is optional.
The server you will set up will logically be on linux, although no one is stopping you from using one Windows Server. But if you are not good with ssh, then a free server management program will help you out.
This will make sure that all the necessary programs like Apache, My-SQL, php and whatever else you want are properly installed. At the same time, it will be able to manage your server through a graphical environment and through a browser.
Everything will look exactly like you see an administrative panel of the server you rent, only this time you will be the root.
What is VirtualBox?
VirtualBox is a software virtualization program that you can install on your operating system (just like you would a regular program). It supports the creation and management of virtual machines on which you can install a second operating system (or more).
In VirtualBox terminology, the operating system on which you install VirtualBox (i.e. your normal operating system) is called the host. The operating system you install in VirtualBox (that is, inside the virtual machine) is called a guest or in English guest.
For this tutorial, we will use VirtualBox and Windows 10 as the host operating system. But there's no reason you can't use a Linux or macOS distribution.
As a guest we will install Ubuntu Server and finally we will install an administrative panel to gain web access to manage our server.
Install VirtualBox
The first thing you need to do is install VirtualBox. Download it from their official website, from here. If you have Windows, select the Windows host link.
The installation process is simple and needs no special mention. After installing it, open it and familiarize yourself with their graphical environment.
Download Ubuntu Server
The next thing to do is grab a copy of Ubuntu Server. You can do it from their download page.
Select option 2 (Manual server installation) which will download an ISO file, size 1,47GB to your computer.
At the time of writing, the current LTS release is Ubuntu Server 22.04, and that's what we'll be using. It is supported until April 2025 and is available in 64-bit.
Create a new virtual machine
And let's start building a virtual server running Ubuntu Server.
Start VirtualBox.
It should open the VirtualBox Manager, which is the interface from which you will manage all your virtual machines.
Then click on “New” (in the upper right corner of the VirtualBox Manager), give a name to your virtual machine, set the point on your hard drive where the virtual guest will be installed and correctly set the next two drop-down menus that have to do with the type and version of the guest.
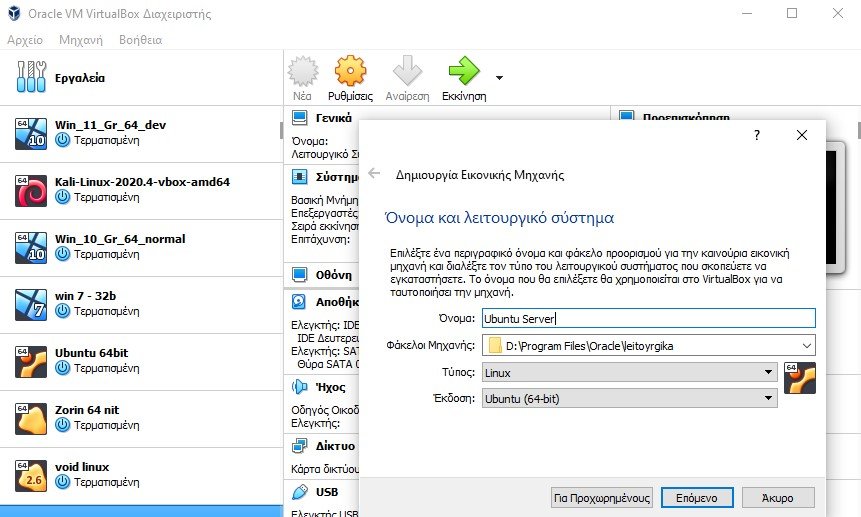
The last two settings do not have to be completely correct. In fact, with these you tell VisualBox to prepare the virtual machine with the minimum requirements of the specific operating system.
Click Next.
Memory Setting
The wizard will now ask you to select the amount of memory (RAM) in megabytes to allocate to the virtual machine. We chose 4 GB (4096 megabytes) because we have 16 GB and "we have some left over". In fact, Ubuntu only needs 1 GB, which is what VirtualBox recommends.
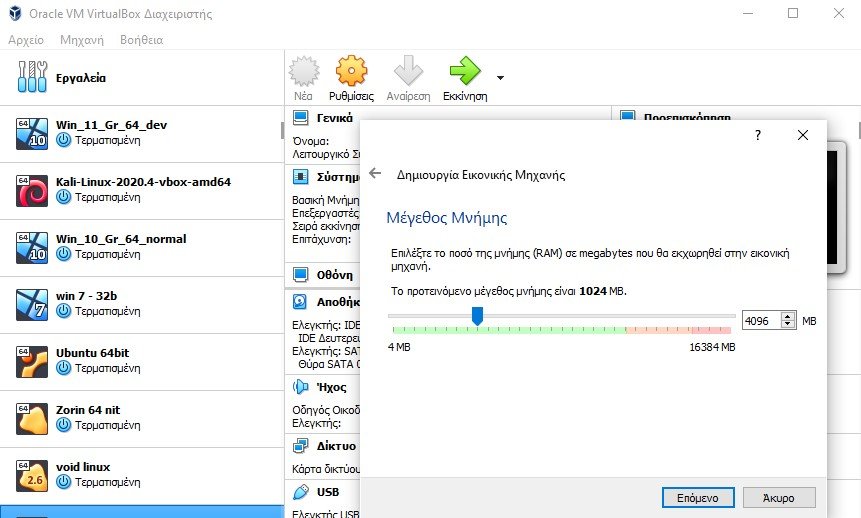
Here make sure not to overdo it. If you allocate too much memory the result will be that your physical machine will not have enough memory to run neither the main program (VirtualBox) nor even your host operating system (in our case Windows 10).
Click Next.
Virtual hard disk
You will be prompted to add a virtual hard disk to the new machine. Make sure “Create a virtual hard disk now” is selected, then click “Create”.
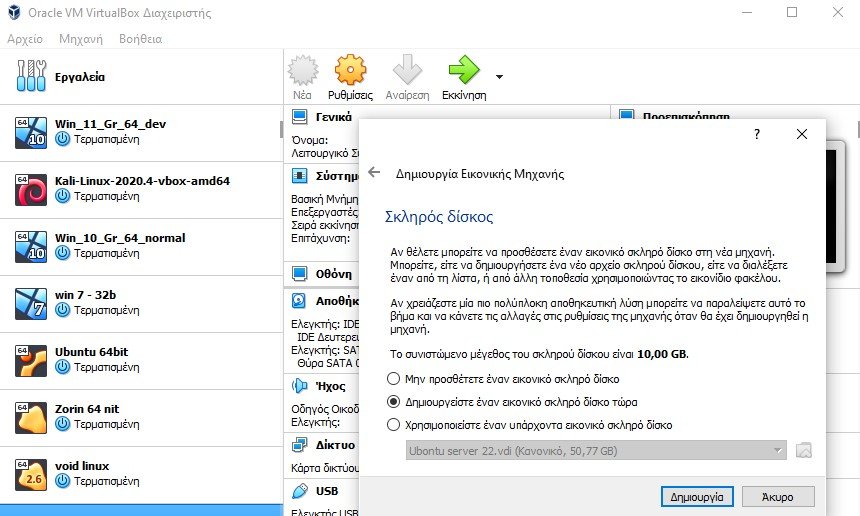
Now we need to select the file type for the new virtual hard disk. Make sure VDI (VirtualBox Disk Image) is selected.
Also, if you want to change the size of the virtual hard disk and increase the size recommended by VirtualBox, click the "Advanced" button
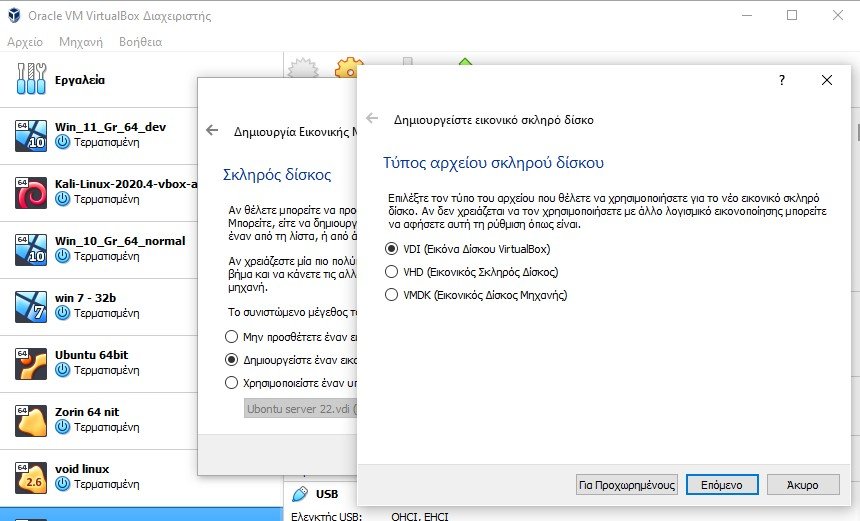
This makes sense because since you want to install a management panel on your virtual server, as well as on your website, you will need at least 50 GB of disk space to be covered.
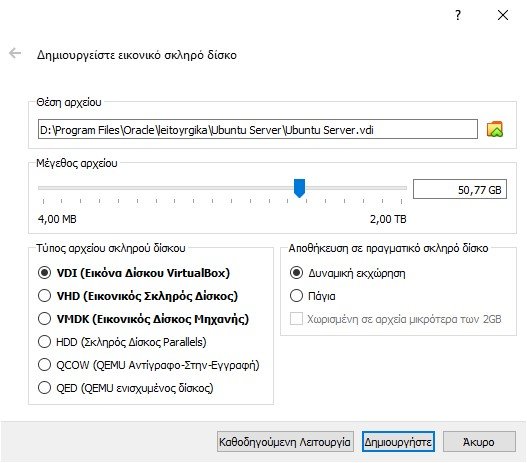
Resize the virtual disk accordingly and press the “Create” button.
Network Card
The hard drive should now be created and you should be back in the VirtualBox Manager. You should be able to see your new virtual machine created on the left.
Make sure your virtual machine is selected and click Settings. Then press “Network” from the menu on the left. In theory VirtualBox has configured your new virtual machine with one network card 1 and on a NAT network.
Change the type of network and from NAT select "Bridged card" (bridge adapter). Underneath, in the name, leave what VirtualBox suggests.
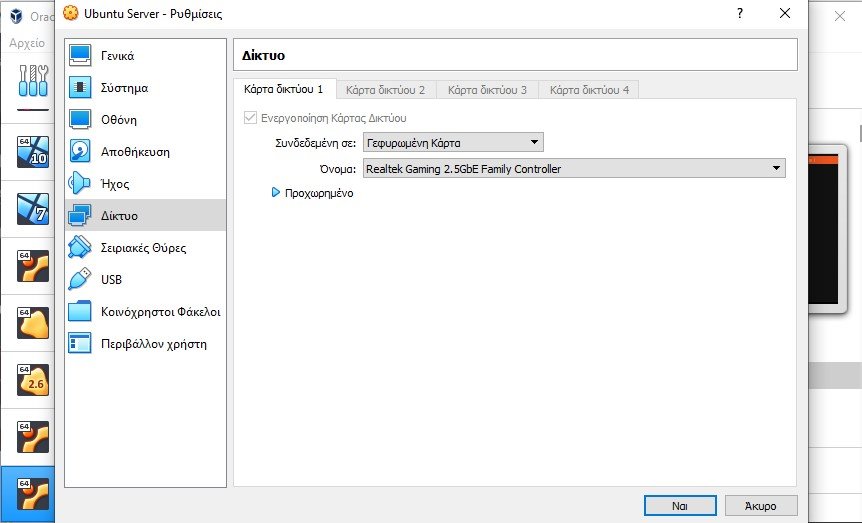
Press the “Yes” button to confirm your selection.
With this type of network (bridged card) essentially your virtual machine gets an internal IP directly from your router, without anyone going through it. With NAT, the virtual machine would probably have IP 10.0.02.15, while now it gets the first free IP that the router will give it.
Trust us, that's oversimplifying things. For the router the virtual machine is now a normal machine connected to your internal network. You will need this practice later.
Adjust the CPU
Finally set how much CPU the virtual machine will reserve. In the VirtualBox manager go to Settings > System > Processor.
There give him as many cores as you think. However, don't stick to the 1 core recommended by VirtualBox so that your machine can be a little more decent.
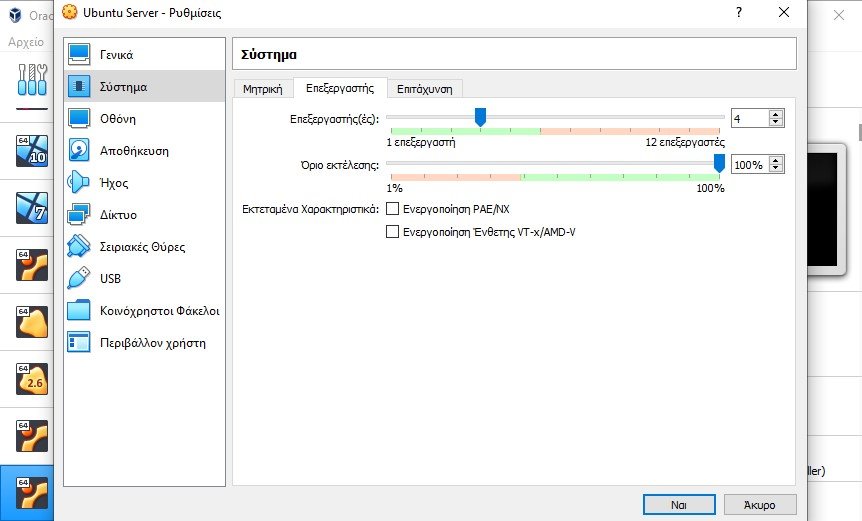
We gave it 4 because we only have 12.
Install Ubuntu
You should be back in the VirtualBox Manager. Make sure your virtual machine is selected.
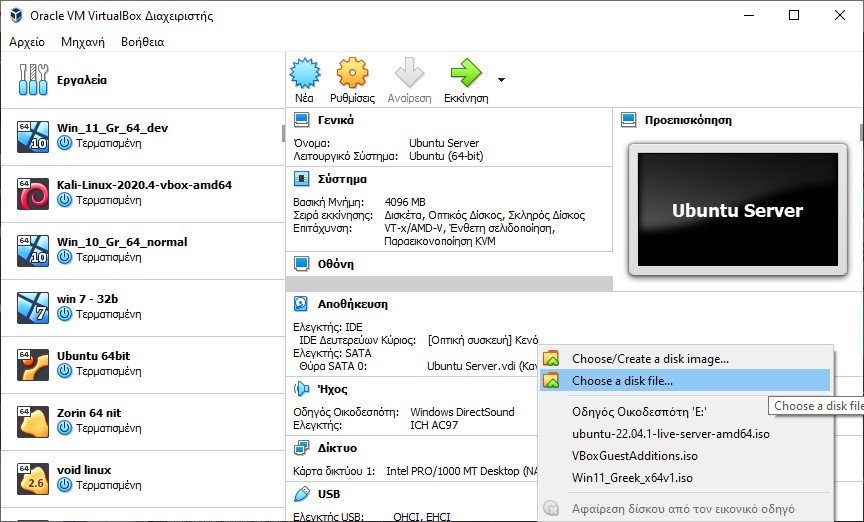
Find the “Optical device” location in the “Storage” section and click on it. Select “Chooce a disk file” and put the Ubuntu Server installation iso file into the virtual digital dvd player, just like you would on a regular computer.
Select the location of the “ubuntu-22.04.1-live-server-amd64.iso” iso file you downloaded earlier and then press Start (the big green arrow to the right).
The Ubuntu installation process will now begin. It consists of multiple steps and is quite painless.
Start Screen
It is the first screen you will see in the new window and it suggests you either start the installation or check the memory.
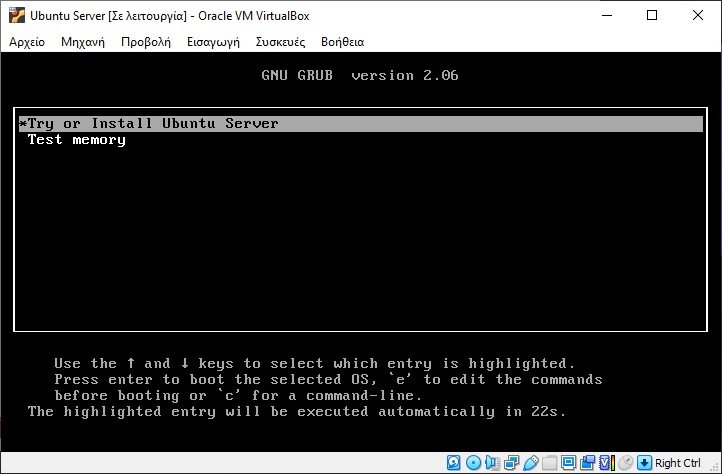
Press Enter to start the installation
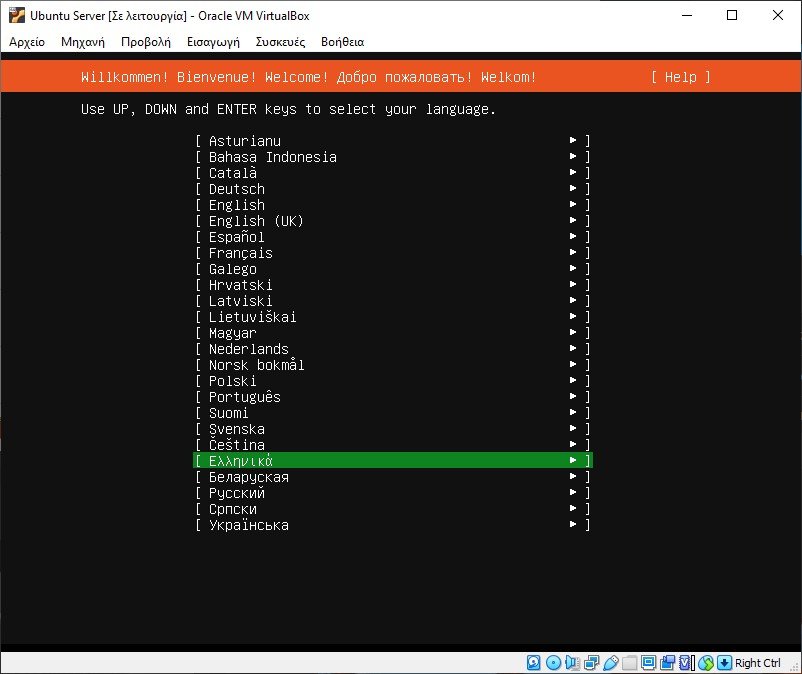
The welcome screen
Here you should select your preferred language. We use Greek.
Keyboard configuration
Here you should select a keyboard layout. As we are using Greek keyboard, so we ask Ubuntu to use Greek.
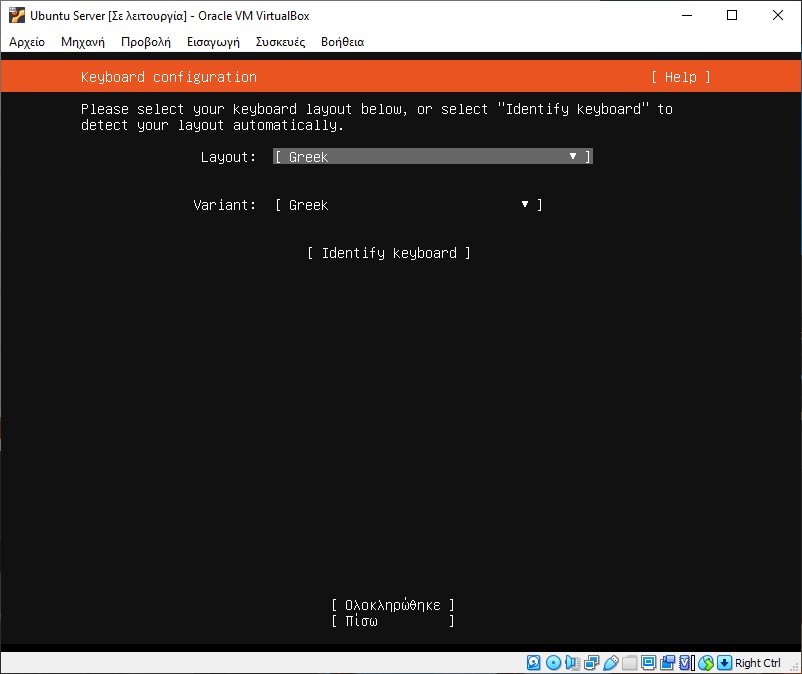
Changes to the drop-down menus are made only with the keyboard, since the mouse is temporarily not working. Use the TAB key to go to the next field and the arrow keys to change positions in the menu
Change keyboard
Ubuntu Server will then ask you if you want it to use the Alt + Shift key combination to change the keyboard from Greek (which you just selected) to the Latin keyboard.
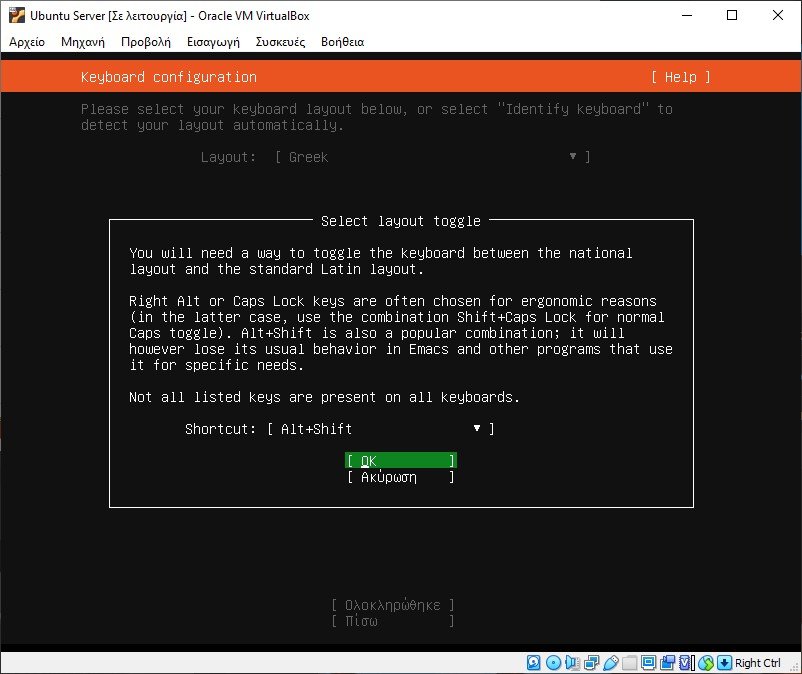
We imagine you are probably comfortable with this combination, so select “OK” and press Enter
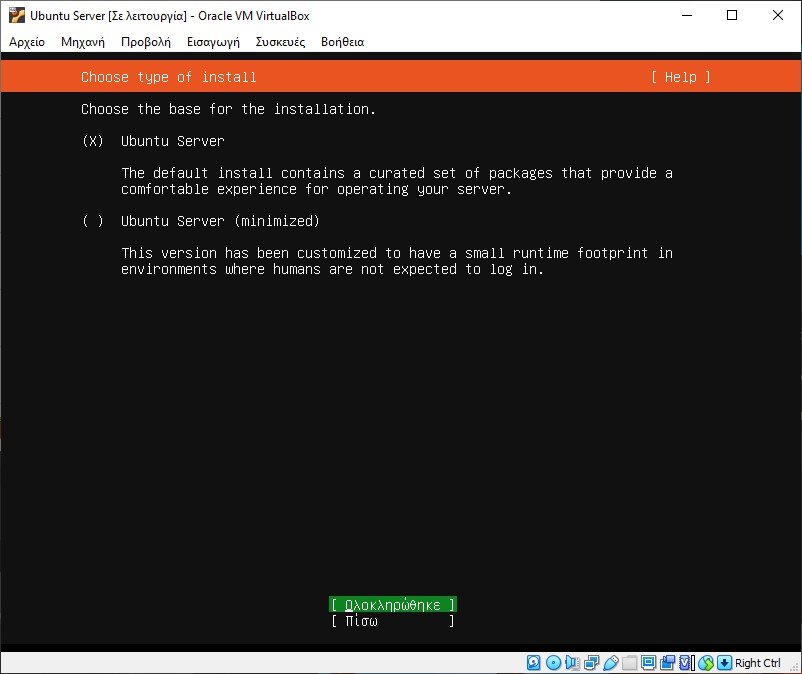
Installation type
You'll then have to choose between the default installation containing a select set of packages and a minified version, which has been tweaked to have a small runtime footprint.
Select the default option.
Network connections
Here Ubuntu will attempt to configure the standard network interface. Normally, if you have taken the step to change the network card in VirtualBox to be connected to a “Bridged Card”, you can simply accept the default and press Enter.
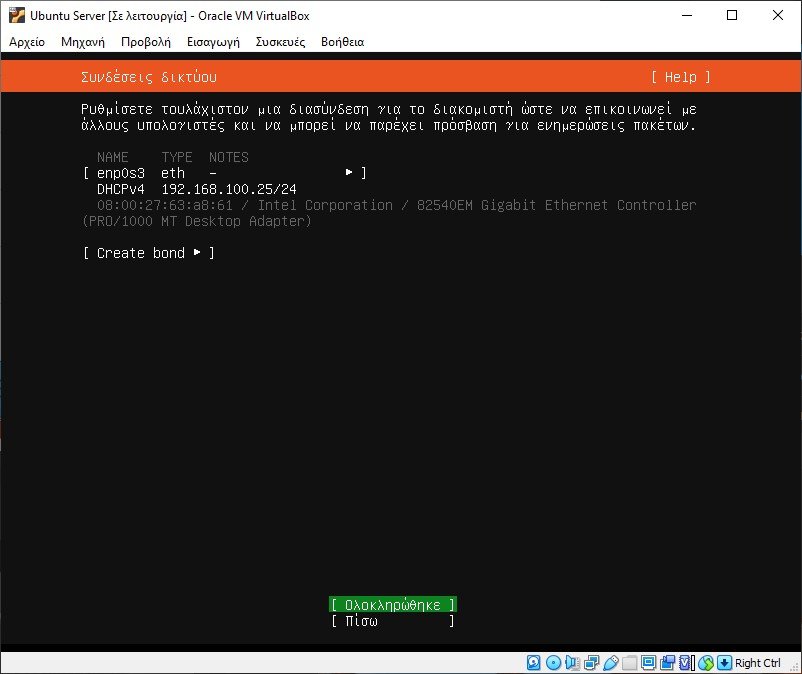
You will understand the difference when you see that the IP chosen by the Ubuntu server installation belongs to the internal network of your router, such as 192.168.100.25 in our case.
If you see something like 10.0.2.XX then the network card in VirtualBox is probably still connected to NAT, so step back, change the card in VirtualBox and go forward again to see similar data as our photo.
Proxy configuration
If your system requires a proxy server to connect to the internet (ours does not), enter its details in the next dialog. Then select Enter.
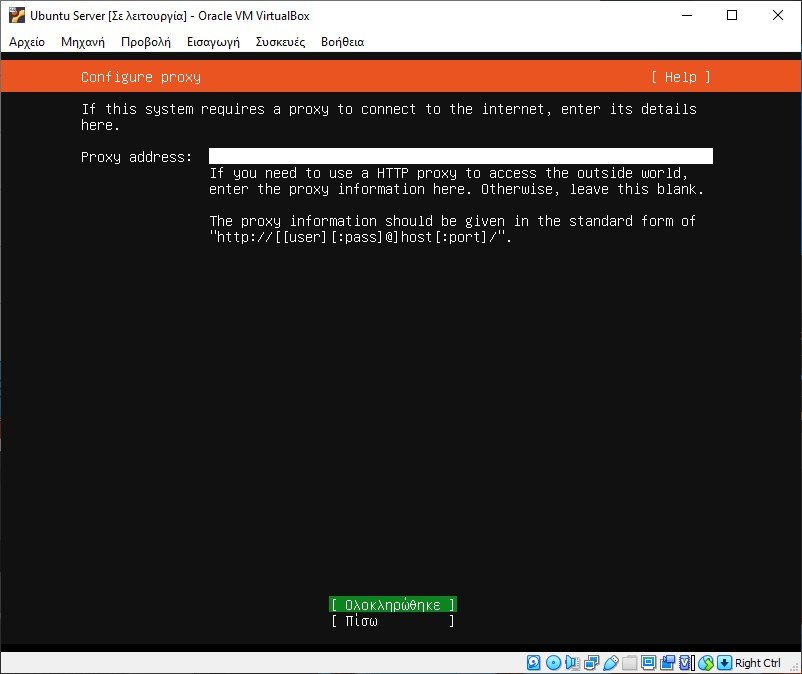
If you choose nothing, leave it blank and press Enter.
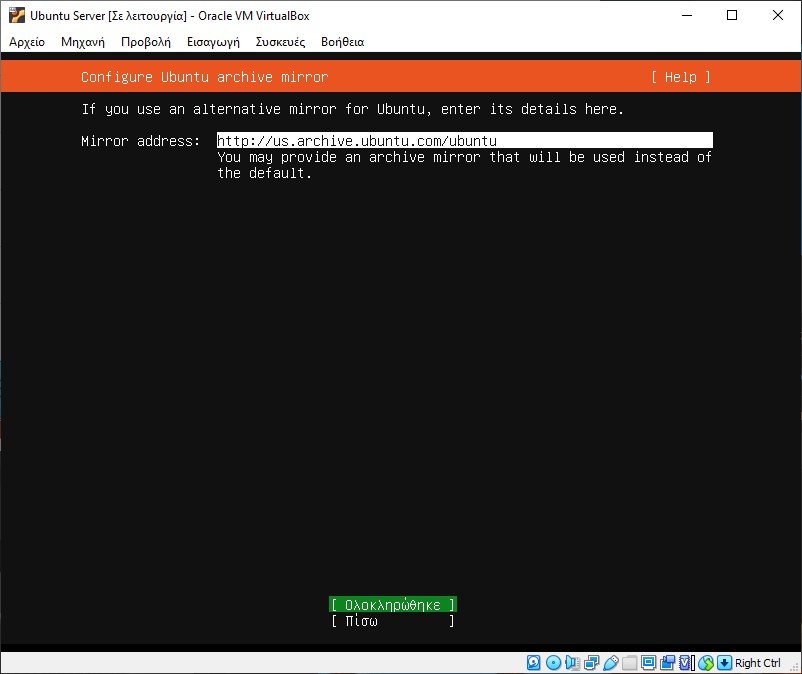
Configuring Ubuntu Archive Mirror
If you want to use an alternative mirror for Ubuntu, you can enter the details here. Otherwise, accept the default mirror by pressing Enter.
Guided storage configuration
The installer can walk you through partitioning an entire disk, or if you prefer, you can do it manually. If you choose to partition an entire disk, you'll still have a chance to review and modify the results before Ubuntu is installed. We selected “Use An Entire Disk”.
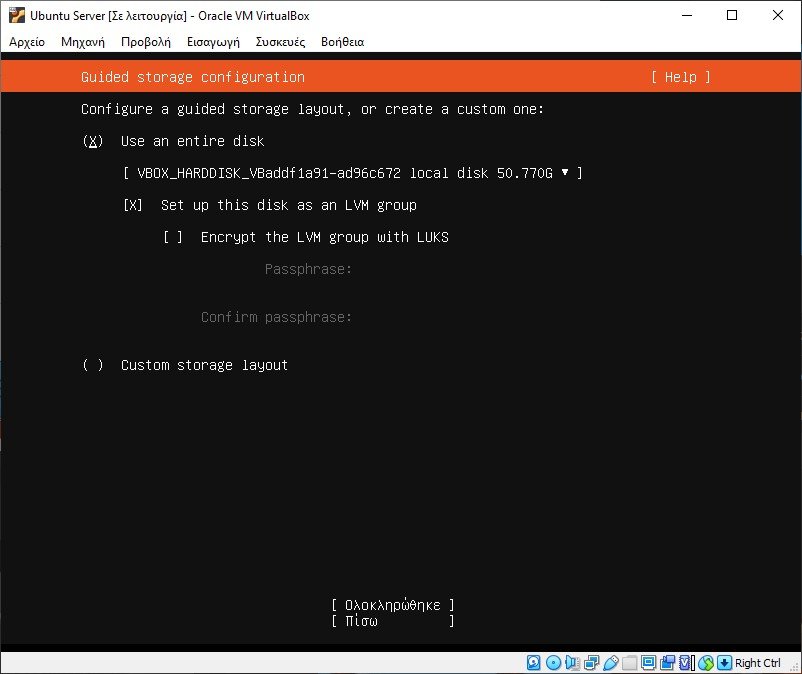
You can optionally instruct the installer to set up the disk as an LVM group, as well as encrypt it using LUKS.
We chose to go with the LVM setup, as LVM offers a number of advantages, such as allowing for easier backups of a working server.
You can read more about LVM here: What is LVM and what is it used for?
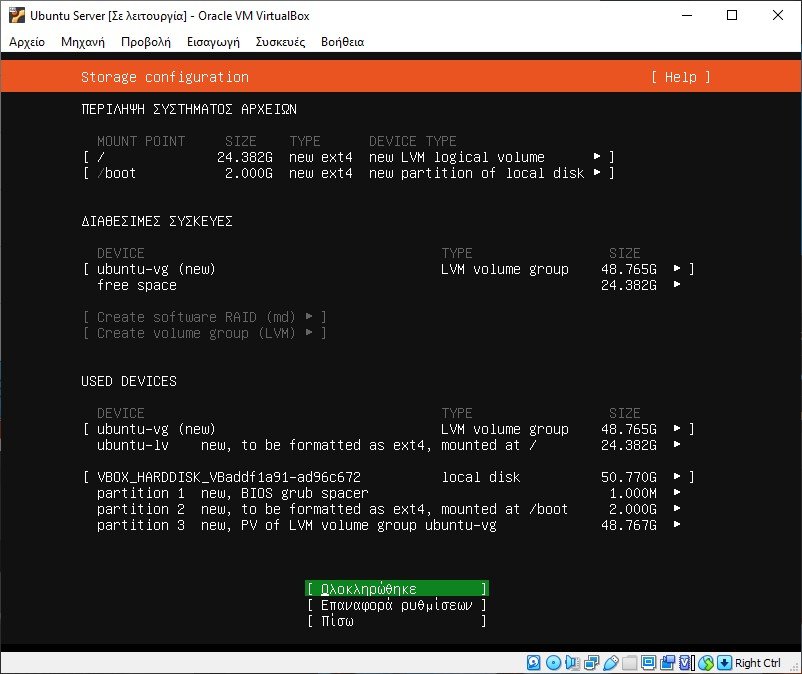
Storage configuration summary
The next screen summarizes the selections you made in the previous steps. If you are satisfied with everything, select Enter.
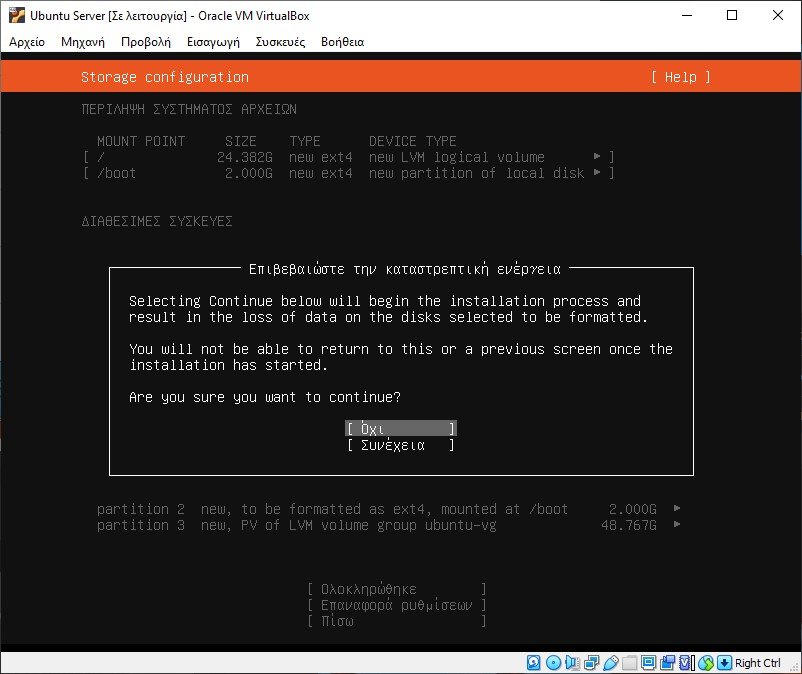
As this is a "destructive action", you ask us to confirm our choice with "Continue".
Profile setting
Here you need to enter:
- Your real name
- Your server name
- The username
- Code access
Fill in these details as desired.
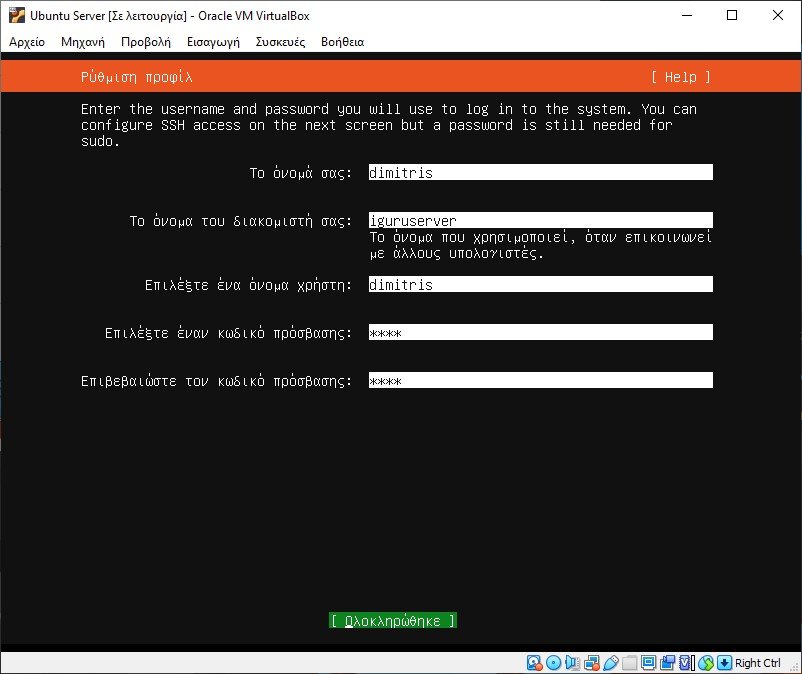
As it seems, we chose the difficult "1234" as a password. Avoid such difficult passwords and prefer something easier, something like “1111”.
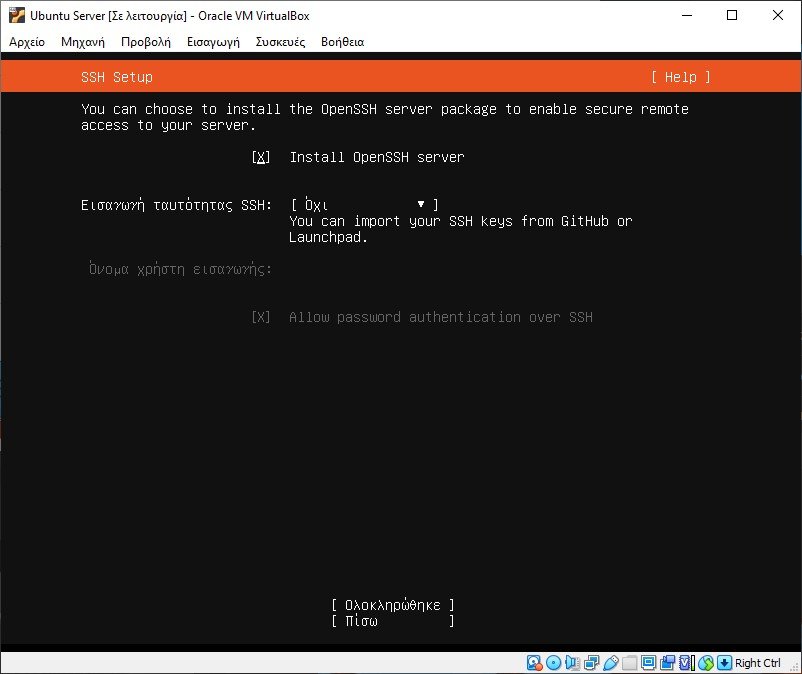
SSH setup
Here you have the opportunity to install the OpenSSH server package. You'll need it to connect to the virtual machine via SSH later, so make sure to select it.
You also have the option to import SSH keys from GitHub or Launchpad. We selected “No” for this option.
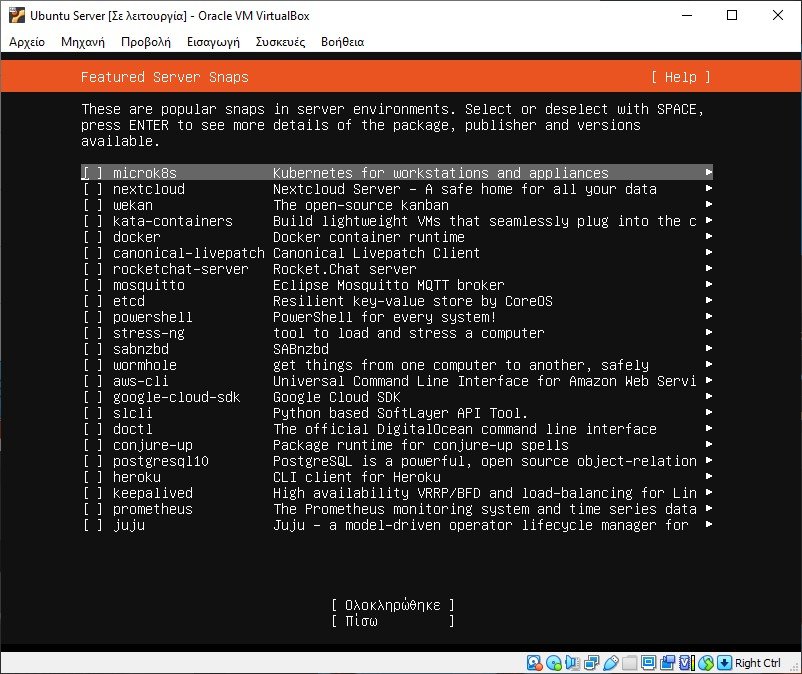
Featured Server Snaps
Here you can choose from a list of popular snaps to install on your system. Snaps are standalone software packages that run on a number of Linux distributions. We didn't choose any, but this is our personal suggestion.
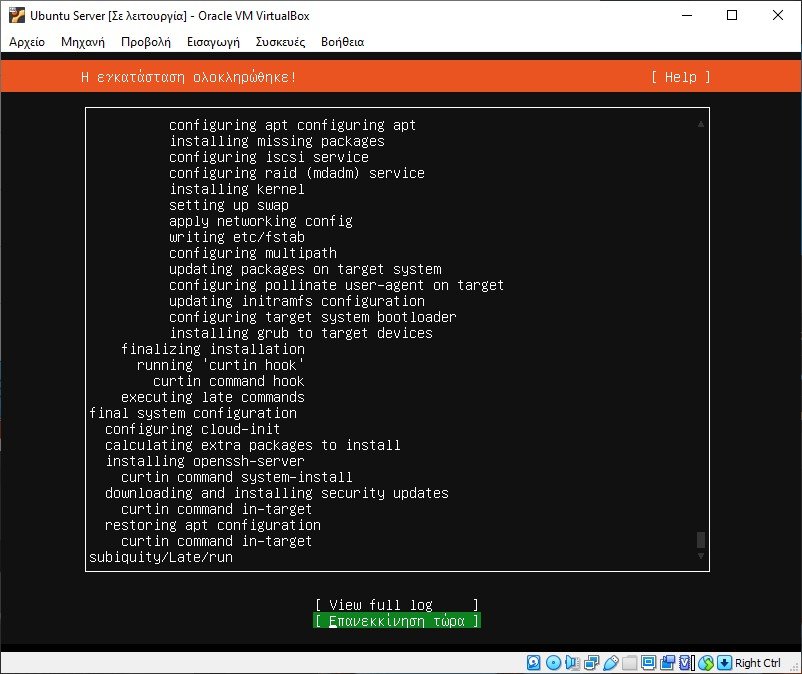
Install and reboot
And that's all. The installer will now install Ubuntu 22.04.
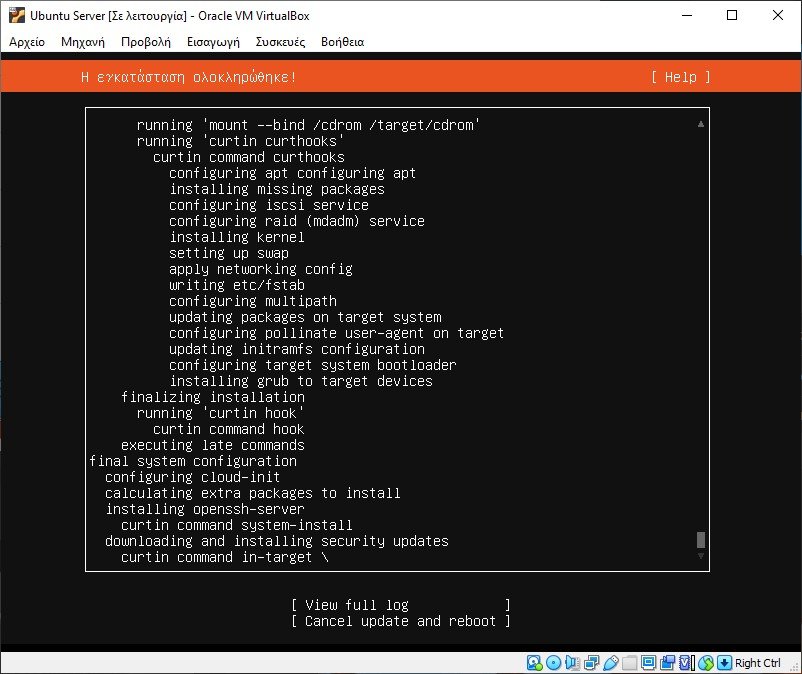
Once it is done, you should select Restart now.
Ubuntu will prompt you to remove the installation disc and press Enter. You can remove the disk through the VirtualBox manager in the same way you added it in the previous steps.
Run and run with SSH
Once your virtual machine restarts, you will need to enter the username and password to log in. In our case “dimitris” and code “1234”.
You will probably notice that some packages can be updated.
Let's fix that. Give the commands::
sudo apt update

sudo apt upgrade
If you see a dialog asking which services need to be restarted, just accept the defaults and go to OK by pressing TAB.
Now let's double check that SSH is installed and running (which it should be if you selected the Install OpenSSH Server option during installation).
Just issue the command: ssh
If you see some results and a suggestion for help then it does exist and is working.
usage: ssh [-46AaCfGgKkMNnqsTtVvXxYy] [-b bind_address] [-c cipher_spec]
[-D [bind_address:]port] [-E log_file] [-e escape_char]
[-F configfile] [-I pkcs11] [-i identity_file]
[-J [user@]host[:port]] [-L address] [-l login_name] [-m mac_spec]
[-O ctl_cmd] [-o option] [-p port] [-Q query_option] [-R address]
[-S ctl_path] [-W host:port] [-w local_tun[:remote_tun]]
[user@]hostname [command]
If you get a “command not found” error, you can install it with:
sudo apt-get install openssh-server
This is the end of the first part of our instructions. You have already installed VirtualBox and Ubuntu Server inside it. In part 2 you will see how to remotely connect to your server with ssh and how to set up a management panel on it.
To go to part 2 click here.
