

Whonix is a free operating system (based on Debian GNU/ Linux ) designed to provide advanced anonymity and security . Its unique design is based on a dual operating system architecture running inside virtual machines.

Its big advantage over other solutions (like a simple VPN or the Tor Browser) is that it prevents IP and DNS leaks in a natural (or rather, architectural) way. Even if your system is infected with malware that tries to find your real IP, it will not succeed, as the desktop environment does not “know” what your real IP address is.
1. The Whonix Architecture
Whonix consists of two separate virtual machines that work together harmoniously:
• Whonix Gateway: This virtual machine acts as a network gateway. It is the only one that has direct access to the internet. Its role is to route ALL network traffic exclusively through the Tor network.
• Whonix-Workstation: This is the machine you work on (surfing, chatting, managing files). It is completely disconnected from the real internet and ONLY connects to the Whonix-Gateway. So it is forced to send all its data through Tor.
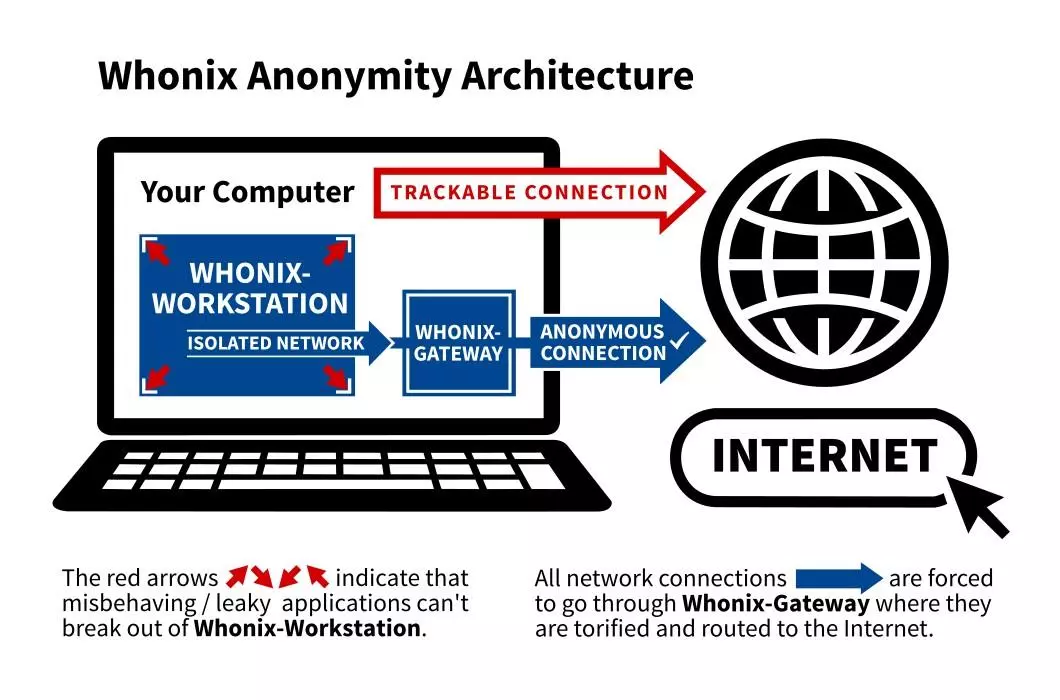
Figure 1: Whonix Architecture Diagram (Workstation -> Gateway)
2. Installing Whonix (via VirtualBox)
The most popular and easiest way to run Whonix is through Oracle VM VirtualBox.
Step 1: Download the required programs
1. Download and install VirtualBox from the official website (virtualbox.org).
2. Download the file Whonix for VirtualBox (.ova) from its official page (whonix.org/wiki/VirtualBox).
Step 2: Import into VirtualBox
1. Open VirtualBox.
2. Go to File -> Import Appliance…
3. Select the Whonix .ova file you just downloaded and click Next/Finish. Leave the default settings.
4. After importing, you will see two new virtual machines in your list: Whonix-Gateway and Whonix Workstation.
3. How to use Whonix
Step 1: Launch the Gateway
You should always start Whonix-Gateway first. Select it in VirtualBox and press “Start”. The first time you open it, a Whonix Setup Wizard will appear.
Accept the terms and select “Connect” to connect to the Tor network. Once you see the message “Connected to Tor”, minimize (do not close!) this window.
Step 2: Launch Workstation
Once the Gateway is connected, start Whonix-Workstation. This will be your workspace. It will perform a quick systemcheck to make sure the network is secure and up to date.
Step 3: Browse and Work
Inside the Whonix-Workstation you will find the Tor Browser pre-installed. This way you can browse the internet in complete safety. You can also use other included applications, such as email clients or chat, knowing that ALL your data is routed securely.
4. Basic Security Rules (Best Practices)
• Do not log in to personal accounts: If you connect to your personal Facebook or Google account through Whonix, your anonymity is removed (pseudonymity).
• Keep the system up to date: As with any operating system, regularly run the upgrade command (Upgrade Nonroot) offered by Whonix.
• Do not change Tor Browser settings: The default settings are designed to maximize the avoidance of fingerprinting (tracing).
Whonix offers a strong level of protection, especially for journalists, researchers, activists, or anyone who truly cares about their digital privacy.
By following this guide, you can start your browsing safely.


0 reviews
iGuRu.gr