
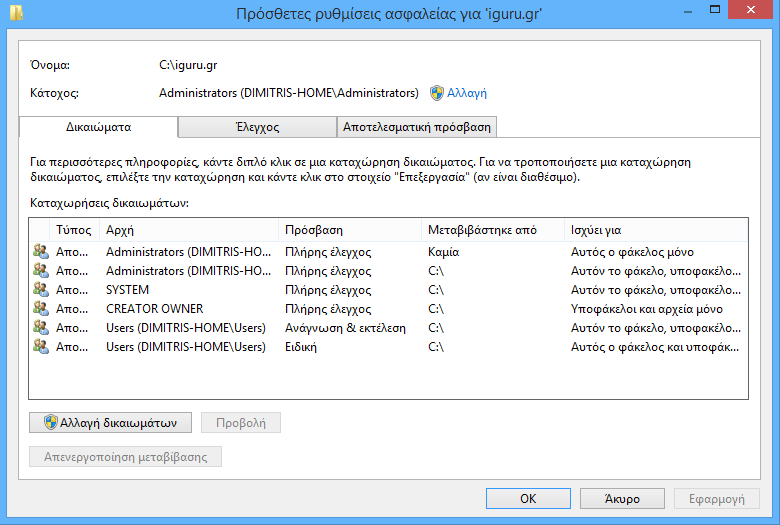
Advanced Security Settings for Windows lets you manually change the owner of a folder or file, change folder permissions, and configure sharing for a selected item.

These settings are made from the Windows tab entitled "Advanced Security Settings" (Advanced Security Settings) and to find it you have to go through two previous tabs right click on the folder> Properties> Security> Advanced) or if you want you have to click 3 with the mouse until it appears.
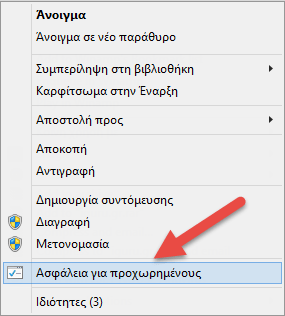
Today we will show you how to add or remove the “Advanced Security” option from the context menu of files, folders and drives disk for all users of Windows 8, Windows 8.1, and Windows 10.
You should sign in as Admin to be able to add or remove the “Advanced Security” menu and all users with access rights to the item will be able to use the new option in the menu.
There are 2 Ways with the same methodology to display this feature in your menu and are done through the registry.
The first and most time consuming is as follows:
- Press the Win + R keys and in the popup window that opens you write regedit and press OK
- In the Registry Editor to open, navigate to
HKEY_CLASSES_ROOT \ * \ shell
and do the following:
- Highlight the "shell" with your mouse and right-click on it. Put your mouse on it and go to Create> Key
- In the new key that will be created under the shell name it Windows.RibbonPermissionsDialog
- Go to the Windows.RibbonPermissionsDialog you created and right-click in the Registry Editor window, go to Create> String Value
- Right-click New Price # 1> Rename and rename New Price # 1 in ExplorerCommandHandler
- Right-click on ExplorerCommandHandler> Modify and enter the value data field {E2765AC3-564C-40F9-AC12-CD393FBAAB0F}
- Repeat step c and rename the New #1 value to CommandStateSync
- Leave the value data for CommandStateSync empty
- Repeat step c and rename the New value # 1 to Icon
- Right-click on Icon> Modify and enter the value data field ntshrui.dll, -122
- Repeat step c and rename the New #1 value to Position
- Right-click on Position> Modify and enter the Bottom value data field
- In the Registry Editor, navigate to
HKEY_CLASSES_ROOT \ Directory \ shell
and there you do exactly the same actions as described in steps a through b.i (ie all the previous steps from “Mark your shell with your mouse… .. until Right click on the Position
- In Registry Editor again, point to
HKEY_CLASSES_ROOT \ Directory \ Background \ shell
and there you do exactly the same actions as described in steps a through b.i (ie all the previous steps from “Mark your shell with your mouse… .. until Right click on the Position
- In Registry Editor again, point to
HKEY_CLASSES_ROOT \ Drive \ shell
and there you do exactly the same actions as described in steps a through b.i (ie all the previous steps from “Mark your shell with your mouse… .. until Right click on the Position
- In Registry Editor again, point to
HKEY_CLASSES_ROOT \ IE.AssocFile.URL \ shell
and there you do exactly the same actions as described in steps a through b.i (ie all the previous steps from “Mark your shell with your mouse… .. until Right click on the Position
That was, close the registry editor and the changes will be automatically saved. If you understand well you make the exact same changes at 5 points in the registry.
If you right-click on any folder now you will see the new option in the menu that will open. If at some point you decide that you no longer want to see "Advanced Security" simply open the registry editor and delete what you added in the previous steps
Second way
To automatically make all the steps in the first mode one click, just download the following file, unzip it, and just run it.
In the Windows security warning that "the publisher cannot be verified .... etc ”do not be afraid and click on“ Run ”.
In the next Windows warning tab titled "Registry Editor" that asks "Adding information may change unintentionally …… Are you sure you want to continue?" press "Yes".
And on the third tab of Windows called "Registry Editor" asking you "Keys and values included in ... .. successfully added" click "OK"
That was, now you have the extra choice in your menu.
If you want to delete all the above work and delete from your menu the option "Advanced Security" download the following file, unzip it and just run it. Say the same thing to all the Windows warning tabs that appear.
Good luck !!!!
