
You can create a toolbar in the Windows taskbar that will allow you to start your favorites programs quickly and easily using a single mouse click.
For young people users to explain that the task bar is the black bar at the bottom of the Windows 10 screen that contains the start button, the programs that you are currently running, and the utilities that are running from Windows 10. To this line you can add something like a "menu" (called tool bar for Microsoft), where by opening it you can have the programs you work most often.
In fact, this toolbar can be reconfigured at any time with all the program shortcuts you want. You can also easily copy and move the toolbar to other computer systems.
Η quick start toolbar was available in earlier versions of Windows, such as Windows XP and Vista. Help users quickly open applications and programs directly from the taskbar. But with the release of Windows 7, Microsoft removed the Quick Launch toolbar from the taskbar.
Newer versions of Windows, such as Windows 7, Windows 8, Windows 10, and Windows 11, do not come with the Quick Launch toolbar, but functionality remains in the shell code.
Those of you who have been using the Quick Start Toolbar since the good old days of Windows XP will definitely love this little trick. Adding a Quick Launch toolbar to the latest version of Windows is very easy.
The following toolbar configuration contains an additional great feature. The way we show you will not lose your settings if you ever run a new installation of Windows. We will use a different folder on a different drive to store all the shortcuts of your favorite programs so that the folder is not deleted by Windows when you reinstall the operating system.
In short it will be one portable quick start toolbar, in the Windows taskbar, which will contain all the shortcuts of your favorite programs and which will be available to add even after a clean install of Windows. Let's see how:
STEP 1:
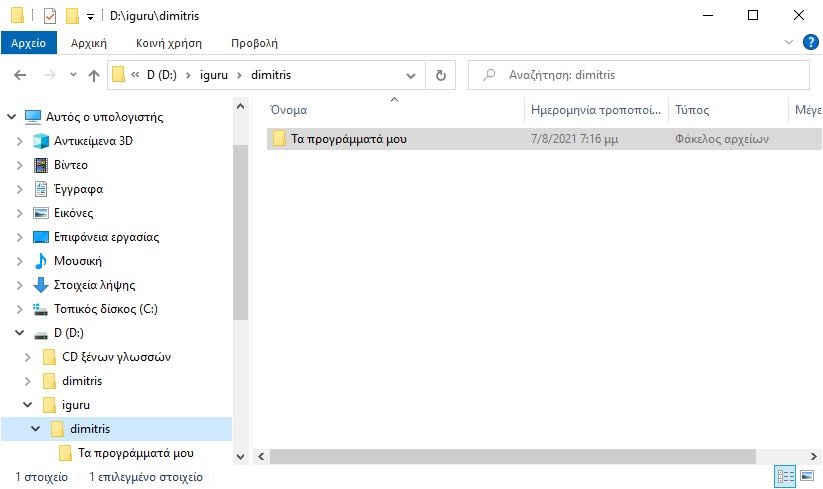
First of all, create a new folder on a partition other than C, such as D :, or E: or any other drive. Do not create the folder on the desktop, in the document folder, or on the C: !! drive.
You can give the folder any name. For example, we create a new folder called "My Programs" in drive D :.
STEP 2:
Now copy all the shortcuts of all the programs you want to the "My Programs" folder to disk D :. For example, you can copy web browser shortcuts, such as Chrome, Firefox, Brave, etc., and shortcuts to other frequently used applications, such as Adobe Photoshop, Calculator, Mail client, Notebook, Office applications, etc. You can also create shortcuts to other folders and paste them into this folder.

NOTE: We assume that you know how to shorten a program in Windows. If not, then the first thing you need to do is run the folder where all your applications are located. To do this, press Win + R and in the Run window that appears, type shell: appsfolder .
Another folder will open containing only your applications.
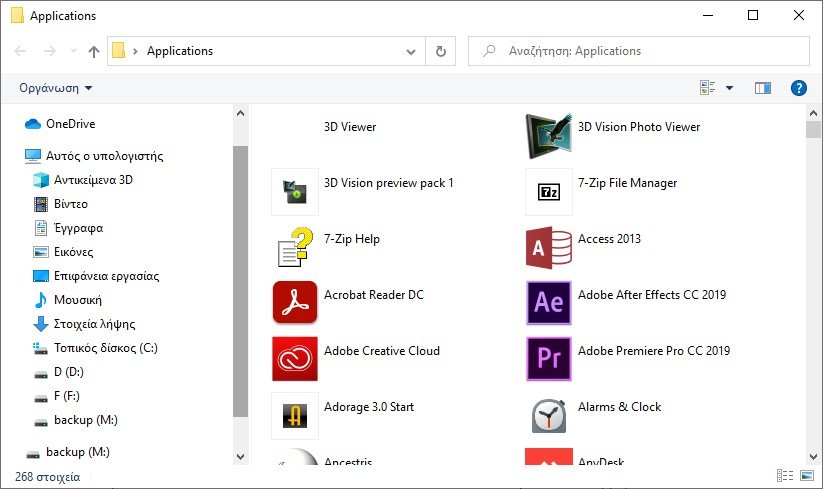
From there, you can create a shortcut by either right-clicking on any of your applications or simply dragging them to the My Programs folder.
BONUS TIP:As you can see in the screenshot above, numbers have been added to the shortcut names. It's not necessary but this way you can arrange your shortcuts in the desired order. Alternatively, once the toolbar is added to the taskbar, you can drag the icons to change their order, but you'll always have to rearrange them if you add the toolbar again in the future.
STEP 3:
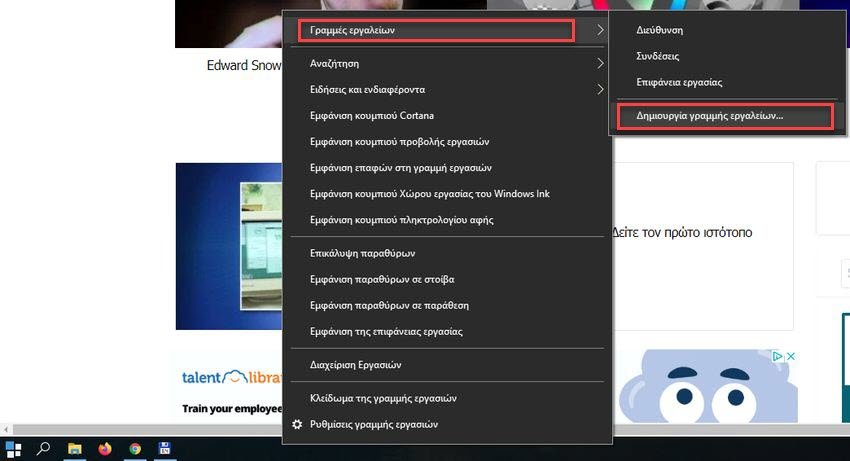
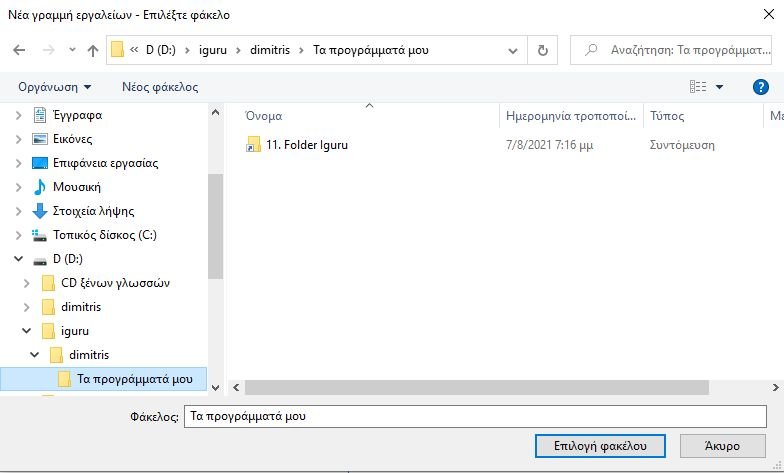
Now right-click on an empty area in the taskbar and select "Toolbars> Create Toolbar…". The navigation pane will open.
Navigate to the drive where you created the toolbar folder, select the folder, and then click Select Folder. In our example, we will select the "My Programs" folder on disk D: and then click the "Select Folder" button.
It will add a new toolbar for the selected folder on the right side of the taskbar near the notification area. But only the folder name will be visible and you will not see the program shortcut icons, much like in the following screenshot:
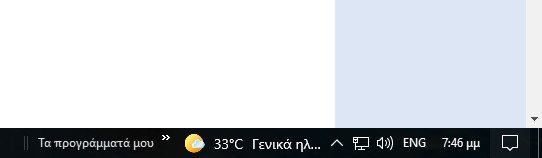
You will need to customize the new toolbar to make it easier to use.
STEP 4:
Right-click on the taskbar and uncheck “Lock the taskbarTo unlock the taskbar.
Move the mouse cursor near the new toolbar and you will see a transfer handle (resembling 2 vertical dashed lines) that appears just before the text of the toolbar title, ie the folder name. Left-click on the transfer handle and hold down your mouse button and drag the toolbar to the left edge of the taskbar, near the Start button. It will move the toolbar near the Start button and you will be able to see the shortcut icons inside the folder on the toolbar.
Now right-click on the text of the "My Programs" toolbar and uncheck "Display text" and "Show title“. It will hide the folder name as well as the names of the shortcuts from the toolbar.
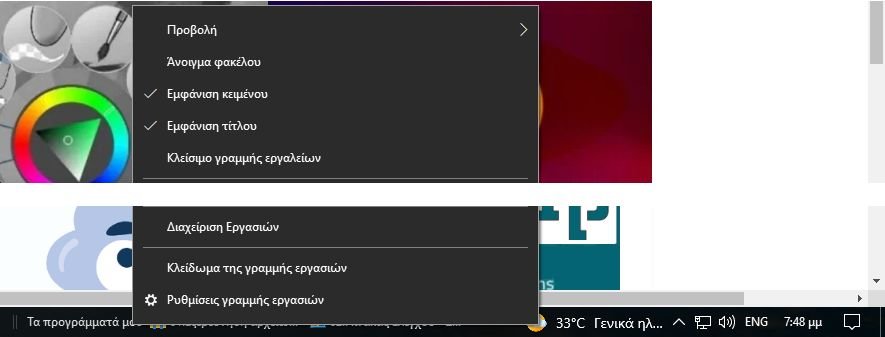
Right-click the toolbar text again and select "View"> "Large Icons". It will make the program shortcut icons larger, similar to the pinned items in the taskbar.
Now move the “My Programs” toolbar again and put it where you want. It suits us in the middle. If you even put in the “My Programs” folder Windows management shortcuts, such as the recycle bin, window switcher, desktop (find these shortcuts in “%appdata%\Microsoft\Internet Explore\Quick Launch”), file explorer (located in shell:appsfolder), you will have a menu in the middle of the taskbar, like Windows 11
Once you have finished adjusting the position of the toolbars, right-click on the taskbar and select "Lock the taskbar" to lock the taskbar.
End. Your new Quick Launch toolbar is ready to use.

Since we save the toolbar folder and all the shortcuts to a different drive, it will remain untouched even if we format and clean the Windows installation on the C: drive.
After a clean install, you can follow the above steps again to add the Toolbar again Fastboot, with all program shortcuts intact.
