Ο bin recycle bin is a second chance to recover deleted files you regretted. It protects you from carelessness and forgives Mistakes and hasty movements.

If you have had the unpleasant experience of accidentally deleting a file or folder from a flash drive or external hard drive, you will have discovered that recovering them is extremely difficult. But if you had a recycle bin then the deleted files would stay there and things would be a piece of cake.
Of course, only the internal hard drives of your operating system have a recycle bin. But you can add a Recycle Bin folder to any flash drive, external hard drive, or even SD card that you plug into your Windows computer. You only need to set it up once to make it work every time.
Make a recycling bin everywhere
The famous Recycle Bin is the destination for deleted files on your Windows computer. When you occasionally delete a file on your computer, it's moved to the Recycle Bin (think of it as a system folder) so you can retrieve it later if needed.
You can optionally add a Recycle Bin to your external hard drive or flash drive using a registry trick.
If you are going to modify the registry it would be a good idea to create one first backup of registry keys just in case.
Let's see how to create a recycling bin:
Step 1: Open a Run dialog box by pressing the Win + R keys at the same time.
Step 2: Type regedit and then press Enter to open the Registry Editor.

Step 3: Manually navigate to the following path or copy and paste it into line path at the top: HKEY_CURRENT_USER\SOFTWARE\Microsoft\Windows\CurrentVersion\Policies\Explorer.
If you cannot see the “Explorer” key, right-click “Policies” and then click “Generate -> Key”. Name the new key “Explorer”.
Step 4: Click on any empty space on the right and select “Create -> DWORD (32-bit) Value”. Even if you have 64 bit, choose 32 bit. Name the key to “RecycleBinDrives".
Step 5: Right-click on the “RecycleBinDrives” value and select “Modify”. In the new small window, type in the Price Data field the “ffffffff”, select the hexadecimal base, then click “OK” to save.
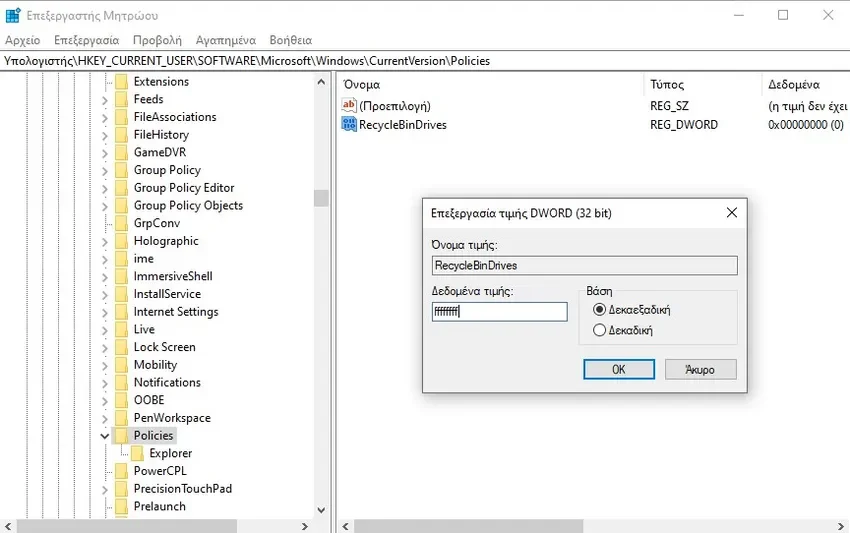
Step 6: Close the registry editor. Changes will be saved automatically. Restart your device for the modifications to take effect.
After restarting, any file or folder you delete from the flash drive will be sent to your computer's default Recycle Bin, and this will automatically apply to any removable drives you plug in. Consider extending the Recycle Bin feature to any external drive you are connecting.
Edit Recycle Bin for USB

You can, if you want, edit the Recycle Bin space limit for each flash drive. Alternatively, you can rely on Windows' automatic settings that set a limit based on disk space.
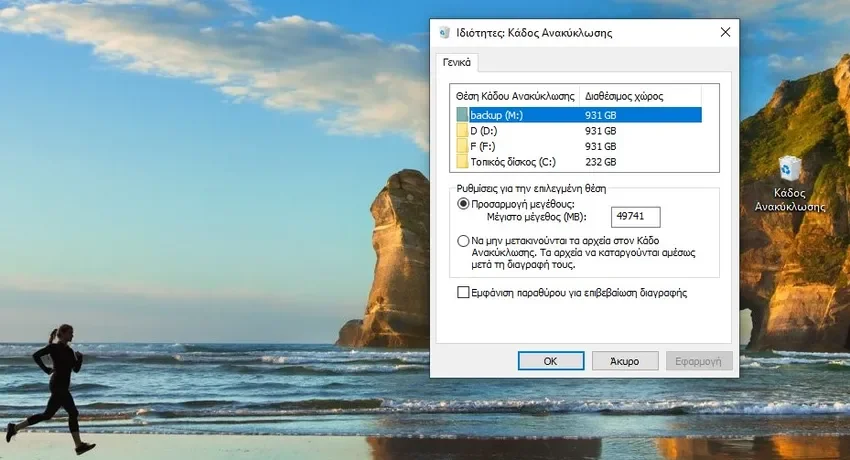
Step 1: Go to your desktop, right click on the icon of the Recycle Bin and select “Properties”.
Step 2: Select the external drive. You can set the space limit, which limits the disk space that can be used to store deleted files, and you can also choose whether to confirm before deleting.
Show folder
Step 1: To show the Recycle Bin inside the flash drive (if you don't see it), access the flash drive from File Explorer. Go ahead on the tab Projection, there click on “Options > Change folder and search options".

Step 2: In the new window, go to the tab “Quick View", uncheck the setting "Hide protected operating system files (recommended)” and then click “OK”.
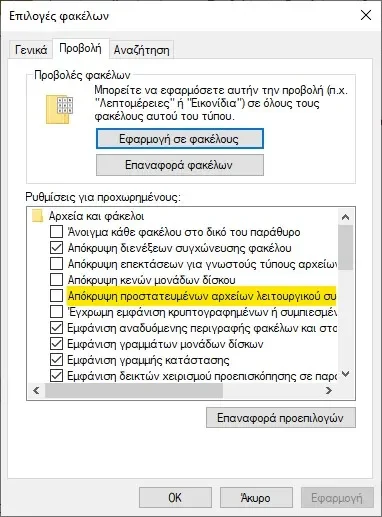
The Recycle Bin folder will now be visible. Note that this option will allow you to see system folders everywhere (which are different from the standard hidden folder).
Also opening the Recycle Bin from the flash drive directory will take you to main Recycle Bin and not just the deleted files on the flash drive.
Delete Recycle Bin for USB

Finally, if you need to disable the flash drive's Recycle Bin, you need to go back to the Registry Editor and delete the “RecycleBinDrive” value you created earlier.
Don't forget to recover any deleted files before deleting it.
Note that when you delete a folder or file and remove the flash drive from the device, the folder will disappear from the Recycle Bin. However, it will reappear when you reconnect it to your device or any other computer that has proper registry editing.


