
The Windows 10 Start menu has evolved a lot and now gives you several management and display options, making it desktop more intimate.

Although not everyone is a fan of this modern approach, although the launch of Windows 7 still has many fanatics, the "live" tiles of Windows 10 borrowed from the Windows Phone software provide a very quick access to your applications and are coming with context menu for more immediate management.
From a technical point of view, by right-clicking on a tile or an application, you can access more options related to that item. For example, the context menu of a tile allows you to resize it, and by right-clicking on an application, you can uninstall it from your computer.
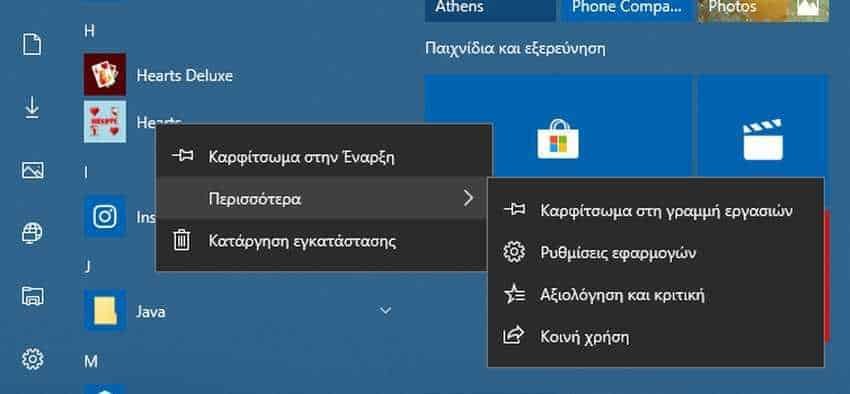
Removing this Start Menu context menu is not something that is aimed at the average home user, but rather at a company administrator or parent who wants to customize their child's profile. The logic of disabling the right-clicking of tiles at the Start has to do with your effort administrator to protect the system from unrelated or malicious users.
On computers running Windows 10 Home, right-clicking on the Start menu is turned off thanks to the registry editor. This means that you must log in to an administrator account, otherwise standard accounts are not allowed to make such changes.
Step 1: Start Registry Editor by pressing Windows + R and typing regedit (alternatively, you can click the Start menu and type either regedit or Registry Editor).
Step 2: Navigate to the following path if you want to configure changes for all user accounts on your Windows 10 computer:
HKEY_LOCAL_MACHINE \ SOFTWARE \ Policies \ Microsoft \ Windows \ Explorer
If you just want to remove the context menus for the user account you are logged in to, browse to this site:
HKEY_CURRENT_USER \ Software \ Policies \ Microsoft \ Windows \ Explorer
Step 3: On her right side screen, look for an entry called DisableContextMenusInStart. If it is missing, you need to create it by right clicking on its right part window and going to Create > DWORD (32-bit) Value.
Once the DisableContextMenusInStart registry key is created, you must change its value according to your settings. Double-click it and change the default value to 0 to turn off the context menus in the Start menu or to 1 to turn them on (Hexadecimal Base). Removing the DWORD value also restores the standard configuration and activates the context menus.
The above method also works on Windows 10 Pro, but from Windows 10 version 1803 (Updates April 2018) and later it can be done the same by the Group Policy Editor, which allows you to make changes for all users.
This time, you must start the Group Policy Editor by clicking the Start menu and typing its name, or by pressing Windows + R and typing gpedit.msc. Navigate to the following location:
User Settings> Management Templates> Taskbar and Start Menu> Disable the context menu in the Start menu
[User Configuration> Administrative Templates> Start menu and Taskbar> Disable context menus in the Start Menu]
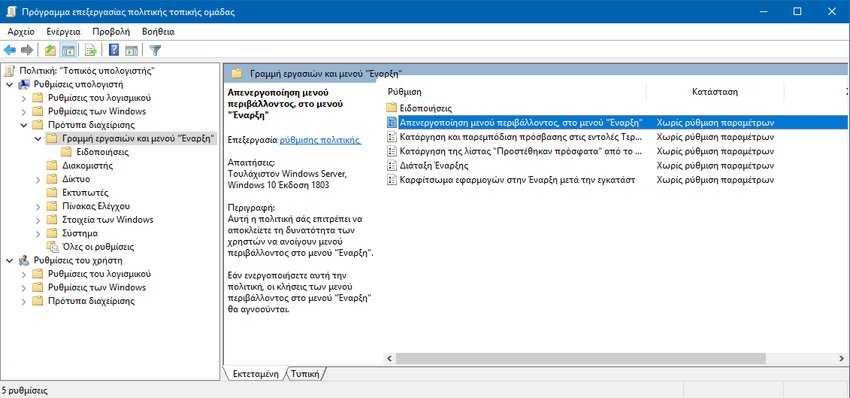
By default, this policy is set to "No Configuration", so you must double-click to access its options and then set it to "On". All changes are applied automatically without the need to restart the system. If you want to return to the original setting later, follow the same steps, but change the policy settings to "Unset" or "Off".

Okay, only valid in the main StartMenu window and nowhere else