
autoPlay is a special feature of Windows, which allows users to select a desired automatic action for various types of media connected to their computer.

You can set autoplay to open your favorite image viewer when you insert a photo tray or to automatically launch a media player for the drive that contains media files. It's actually about saving your time, as the required application starts automatically whenever you connect a device or insert a disc.
In Windows 10, there are several ways to enable or disable AutoPlay. It can be done using the settings, the classic control panel or the registry. Also, there is a special option in group policy that can be used to force it on or off modeof autoplay for all discs in Windows 10. Let's see how to set it up.
Choosing such a setting may not be of interest to the average user but may be useful to a company's computer administrators or even to computers used by children. The policy can be applied to either all user accounts registered on your computer or only to the current user account.
Disable AutoPlay for all drives for a user in Windows 10.
1. Sign in with the username you want to change the autoplay setting.
2. Open Registry Editor.
3. Get a copy security just in case everything goes wrong. See here how.
4. Go to the following registry key:
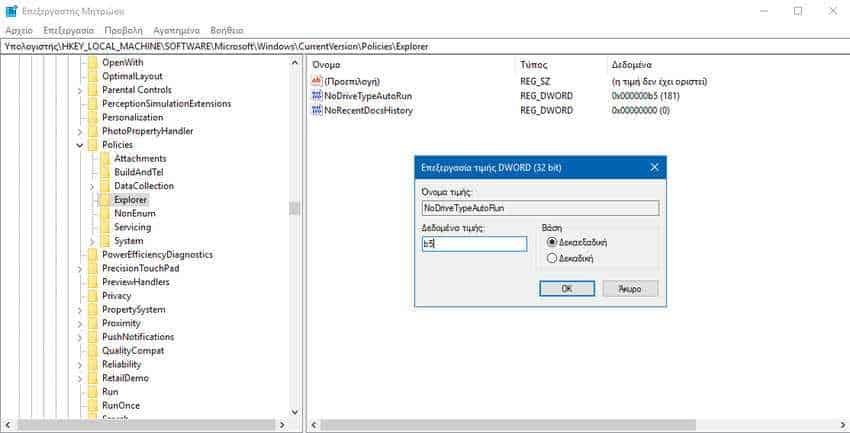
HKEY_CURRENT_USER\ Software \ Microsoft \ Windows \ CurrentVersion \ Policies \ Explorer
If you do not have such a key, just create it.
5. Here, create a new DWORD 32 bit named named NoDriveTypeAutoRun. Note: Even if you are running Windows with 64-bit, you should use DWORD 32 bit as the value type.
6. Set it to 255 and click "Decimal" to turn off Auto Play for all discs.
If you want to disable autoplay only for CD drives and removable media then click Hexadecimal and set it to b5.
7. press the OK button, and then simply close the registry editor.
To make the changes made to the Registry, you should log out and log back into the user account again.
If you want to unblock the auto play function simply delete the NoDriveTypeAutoRun value.
Disable AutoPlay for all drives for all users
To disable AutoPlay for all drives for all users, make sure you log in as an Administrator before proceeding.
1. Open Registry Editor.
2. Take a backup if everything goes wrong. See here how.
3. Go to the following registry key:
HKEY_LOCAL_MACHINE\ Software \ Microsoft \ Windows \ CurrentVersion \ Policies \ Explorer
If you do not have such a key, just create it.
4. Here, create a new DWORD 32 bit named named NoDriveTypeAutoRun. Note: Even if you are running Windows with 64-bit, you should use DWORD 32 bit as the value type.
5. Set it to 255 and click on Demical to disable AutoPlay for all discs.
If you want to disable autoplay only for CD drives and removable media then click Hexadecimal and set it to b5.
6. Restart Windows 10 to apply the restriction and you are done.
If you want to unblock the auto play function simply delete the NoDriveTypeAutoRun value.
Turn off AutoPlay for all drives with the Gpededmsc
If you're running Windows 10 Pro, Enterprise or Education, you can use the Local Group Policy app to set the options listed above in an easier, graphical interface. Do the following.
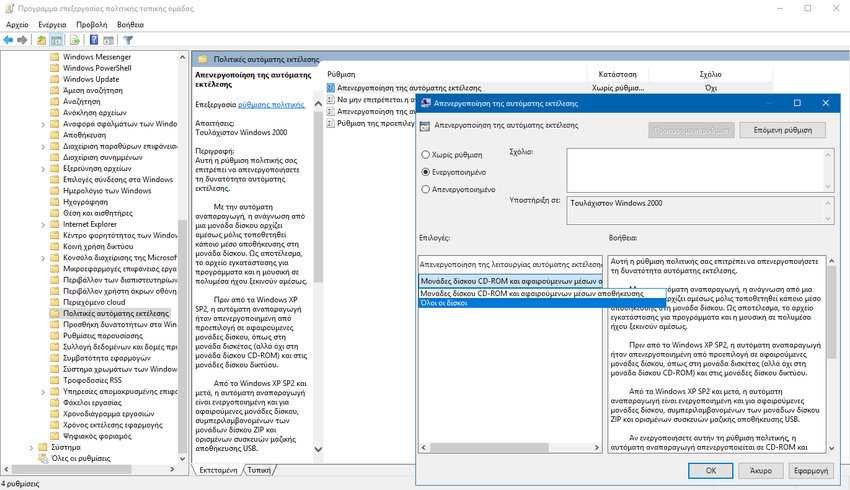
1. Press the Win + R keys on your keyboard and type: gpedit.msc. Press Enter.
2. The Local Group Policy Editor will open. Go to "User settings > management templates> Windows Components> AutoPlay Policies ”(User Configuration \ Administrative Templates \ Windows Components \ AutoPlay Policies).
3. Select the "Disable Auto-Run" option and set it to all drives.
4. Press the "Apply" key and then "OK".
Disable auto-play for all drives for all users with Gpedit.msc
1. Press the Win + R keys on your keyboard and type: gpedit.msc. Press Enter.
2. The Local Group Policy Editor will open. Go to "Computer Settings > management templates> Windows components> AutoPlay policies ”(Computer Configuration \ Administrative Templates \ Windows Components \ AutoPlay Policies).
3. Select the "Disable Auto-Run" option and set it to all drives.
4. Press the "Apply" key and then "OK".
