
If you are worried about someone trying to guess the code access of your computer, you can set Windows to temporarily block login attempts after a certain number of failed attempts.
Assuming you have not set them up Windows as long as the user input, the system operation allows you an unlimited number of password attempts for local user accounts. Of course, this feature is convenient when you do not remember your password, but it also offers an unlimited number of tampering attempts to other people who do not have physical access to your computer.
Although there are ways to bypass or reset a password, setting Windows to temporarily suspend login attempts after several failed code entries can at least help prevent occasional burglary attempts if you are using a local user account. See below how to make these settings.
Useful notes: By modifying this setting, you give the right have someone prank you by locking your computer for a period of time simply by entering wrong passwords on purpose. It would be good to have another admin account that can unlock the regular account.
Also, these settings apply only to local user accounts, and do not work if you sign up for Windows 8 or 10 using a Microsoft account. If you want to use the lock settings, you will need to reset your Microsoft account first to a local one. If you prefer to continue using it Your Microsoft account, you can go to the security settings page and log in. From there you'll be able to change things like the procase two-step verification, creating trusted devices, and more. Unfortunately, there is no lockout setting for Microsoft accounts that works like in this example. However, the following settings will work fine on local user accounts in Windows 7, 8, and 10.
For users of the Windows Home Edition, the only way to set the input attempt limit is through the command line. For Pro and Enterprise versions of Windows, you can use either the command line or a much easier process through local group policy processing.
In addition, note that if you start the following procedures you should complete them, otherwise you may lock yourself out.
Using the command line
1. Open command prompt with administrator rights. If you don't know how, press the Win + X keys at the same time and from the drop-down menu select "Command Prompt (Admin)".
2. At the command prompt, type the following command, and then press Enter: net accounts
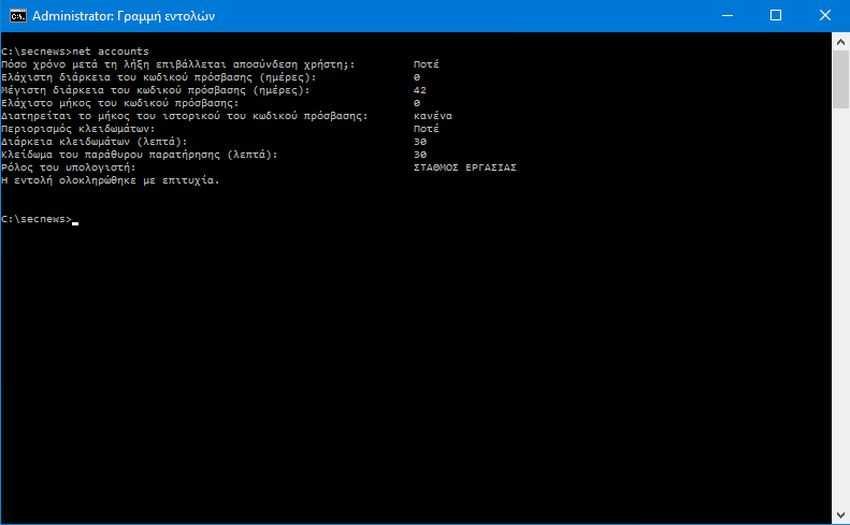
3. This command shows your current password policy, which by default should be "Restrict Lockouts: Never", which means your account won't lock you out, no matter how many times you enter a password incorrectly. Let's start by setting the failed attempt limit. You can set any number you want, but we recommend that you set it in at least three attempts. Type the following command, replacing the number at the end with the number of failed password attempts you want:
net accounts / lockoutthreshold: 3
4. Now let us define the length of a lock. This number determines for how long in minutes an account will be locked once the limit of failed password attempts is reached. We recommend 30 minutes, but you can set what you like. We recall that the number represents minutes of the hour.
net accounts / lockoutduration: 30
5. Finally, we will set the duration of the viewing window. This number determines how many minutes the failed attempt counter will need to zero, with the logic of course not having reached the maximum number of failed attempts. That is, for our example where we have a limit of 3 failed attempts if one does two failed attempts and then stops, the meter will start to count three more attempts after the X minutes that you set it now. Set up the viewing window using the following command, replacing the number at the end with the number of minutes you want to use. Again, we think 30 minutes are a good time.
net accounts / lockoutwindow: 30
6. When you're finished, you can use the net accounts again to verify the settings you've made.
7. Close the command prompt window and you are done. When you're now at a lock screen asking for a code, don't expect to see any indication of how many attempts you have, and if you get locked out, you won't have any notification of how long you'll be locked out. computer.
If you ever want to change the settings, just repeat the steps with the new options you want. If you want to completely disable all of the above, all you have to do is open a command line with administrator privileges and set the limit of failed account attempts in 0 by using the following command:
net accounts / lockoutthreshold: 0
You do not have to worry about the other two settings. When you set the lockout limit to 0, the lockout duration and the lockout window setting will become inappropriate.
Using Local Group Policy * (for Pro and Enterprise Users)
If you are using a Pro or Enterprise edition, the easiest way to set the limits is with your local group policy editor. An important note, however: If your computer is part of a company's network, it is highly likely that your local group policy settings are already set at the domain level and have replaced anything you set in the local group policy. And anyway, if you are part of a company network, you should always consult with your administrator before making any changes.
1. Open the local group policy editor. If you don't know how, press the Win + R keys at the same time, and in the "Run" window that appears, type "gpedit.msc", and then click the OK button. Alternatively, if you want to apply the policy to specific users or groups, open the MSC file of the specific users (if you have created one).
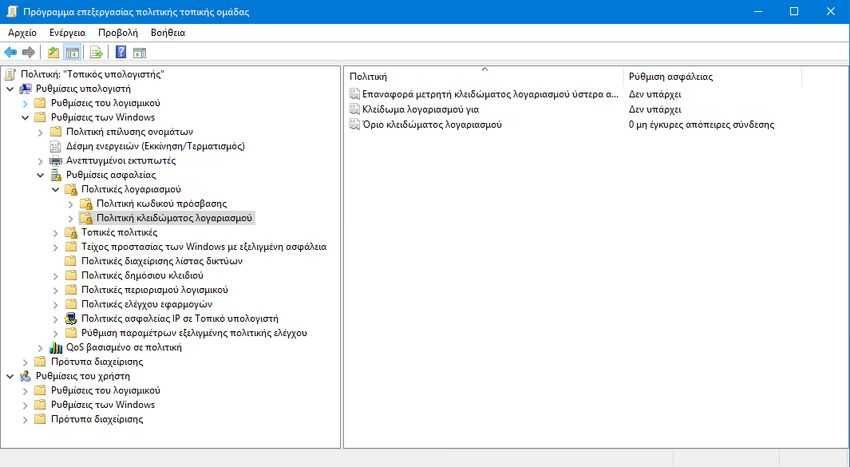
2. In editor local group policy go to the left pane and navigate to Computer Settings > Windows Settings > Security Settings > Account Policies > Account Lockout Policy.
3. From there go to the left pane and double click on "Account Lockout Limit".
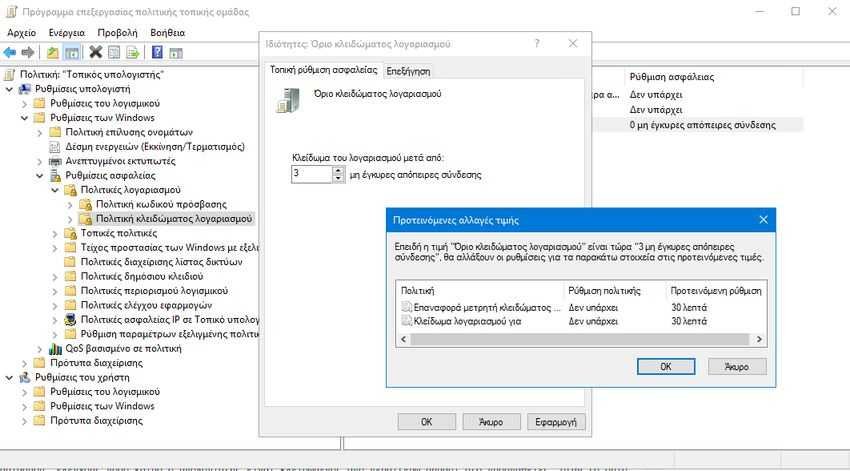
4. In the properties window of the setting by default the "invalid connection attempts" is set to 0, which basically means the setting is disabled. To change this, simply select a new number greater than one. We recommend that you set this to at least three to ensure that you are not locked out of your own system if you accidentally enter the wrong password. Click "OK" when you're done.
5. Τα Windows τώρα θα ρυθμίσουν αυτόματα τις δύο σχετικές ρυθμίσεις στα τριάντα λεπτά. Το "Κλείδωμα λογαριασμού για" ελέγχει πόσο καιρό ο υπολογιστής θα είναι κλειδωμένος αν ξεπεραστεί το όριο των αποτυχημένων προσπαθειών. Το "Επαναφορά μετρητή κλειδώματος λογαριασμού μετά από" ελέγχει πόσο χρονικό διάστημα πρέπει να περάσει μετά την τελευταία αποτυχημένη προσπάθεια κωδικού πρόσβασης πριν ο μετρητής ορίου μηδενίσει. Για παράδειγμα, ας υποθέσουμε ότι εισάγετε ένα μη έγκυρο κωδικό πρόσβασης και στη συνέχεια, πληκτρολογήσατε ένα άλλο λάθος κωδικό αμέσως, αλλά δεν προχωρήσατε σε τρίτη δοκιμή. Τριάντα λεπτά μετά την δεύτερη προσπάθεια (τουλάχιστον, αν αφήσετε τις ρυθμίσεις που εισήχθησαν από τα Windows), ο μετρητής θα μηδενίσει και θα έχετε άλλες τρεις προσπάθειες. Δεν μπορείτε να αλλάξετε αυτές τις τιμές εδώ, έτσι απλά κάντε κλικ στο κουμπί "OK" για να προχωρήσετε.
5. Back in the main Local Group Policy editor window, you'll see that all three settings in the Account Lockout Policy folder have changed to reflect the new configuration. You can change any of the settings by double-clicking them to open their properties window, but thirty minutes is a pretty solid setting for both the lockout duration and the lockout counter reset.
6. Once you finish the settings, close the processor. The settings take effect immediately, but since they affect the connection, you will need to log out for the policy to take effect. And if you want to enable the whole setting change "invalid connection attempts" to 0.
