
There are two ways to completely erase a hard drive. Here's what a novice user needs to know to do it quickly and easily.
Is there data on your hard drive that you want to get rid of forever? Maybe you want to sell or donate your computer? Whatever the reason, you definitely just want to make sure that the data on the drive is completely erased.
Your work can be done easily and quickly, either with the built-in Windows tools or with third-party programs. But let's look at things from the beginning.
| Why should you delete your hard drive? |
There are several reasons why you may want to completely erase a hard drive. The key is because you are worried that other people will see your data on the drive when you:
- Sell the hard drive
- Give the hard drive to a friend or relative
- Donate your computer to charity, or church or school, or just throw it away at your nearest recycling store.
There are other minor reasons besides giving your machine away somewhere. It may be necessary to delete the disc for:
- Remove a persistent virus or ransomware
- Replace sensitive personal information data to another disk
- Start using a used drive that the previous owner did not clean
In addition, you may have your own unimaginable reasons for deleting your computer's drive completely. In either case, Windows users have two options:
1. Native Windows 10 built-in tools
2. Third party tools like Darik's Boot and Nuke (DBAN)
Let's look at each option in turn.
| The easy way to delete a hard drive in Windows 10 |
Although some good third-party tools are available, you can be a little hasty or deadly bored. Therefore, finding, going, downloading, and installing the right software may not be what you want to do.
Fortunately, you do not need to worry. Windows 10 has a special command to erase your hard drive.
Before you proceed, however, make sure you know the correct drive letter for the drive you want to erase. You'll find this in Windows Explorer, so note the drive letter. Also note that you won't be able to erase the drive Windows is installed on (usually C). See the next section for a solution to one of these problem.
To do this, you must use the PowerShell environment (or Command prompt), a command-line tool to which you can enter text-based instructions. The command you will use follows this syntax:
Format volume /P:passes
Here, the volume refers to the drive letter, while / P is a switch on the format command, which indicates the passages that the deletion will make and how many times you want to replace each partition on the disk. The more, the safer the deletion. But do not overdo it because it will take you a long time.
So if your drive letter was X and you want five formatting passes, you need to:
1. Right-click the Start button
2. Select Windows PowerShell (Administrator)
3. Write format X: / P: 5
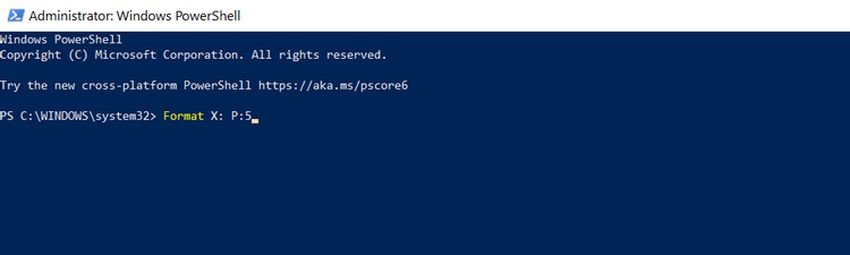
It is so simple. Wait until the process is complete, then reuse your device as you wish.
Wipe a hard drive in Windows 7 and Windows 8
If you have an older version of Windows, such as 7 or 8, then the instructions are the same as in Windows 10. They work with older versions of Windows, up to at least Vista.
For the crazy and the stressful
Because maybe old users read us and you know what they are ε they laugh behind their mustaches, as Portokaloglou says, let's say two conversations for those who have heard that a format does not provide 100% by the skilled thief.
A security trick is before formatting a disc to encrypt it first, two or three times over, giving a large key, and throwing the encryption key in the trash.
The painting control of Windows has such a command, “Encrypt Bitlocker Drives”. Follow our instructions for this work. Then format it and you have ensured that no one is going to read it.
Although you can never be sure ……, right?
| How to completely wipe a hard drive with DBAN |
But what if you want to corrupt the data on drive C? This is usually the drive on which Windows is installed and cannot be erased using the built-in Windows formatting tool.
There are various third party tools available on the market, but perhaps the best is Darik's Boot and Nuke (DBAN). Designed specifically for mass data destruction, DBAN will run in your computer's memory, as a recovery disk or on a live Linux disk.
The DBAN is available in two versions: the free deletion tool and the premium Blancco Drive Eraser. Ignore the paid version (unless you are a business or organization) as the free DBAN will erase your hard drive effortlessly and completely free of charge.
Free DBAN has permanent data deletion, with six deletion standards and supports ATA, SATA and SCSI drives. This should cover all hard drives. But what does this mean? Well, if you need to erase a hard drive inside a tower computer or your laptop, DBAN can handle it.
Ready to back up? Follow these five steps to completely erase a hard drive, especially C.
1. Identify your hard drive
To avoid accidental deletion, start by ensuring that you can identify your hard drive.
The easy way to do this is to open Windows Explorer and check drive C. If the device is labeled OS C: or Windows C: or local drives C: or has the Windows mark on the icon of, then you are in the right area.
However, problems may occur if drive C: is one of many partitions on the same physical drive. This could lead to inadvertent data replacement on all partitions, not just the C drive:
Right-click on the drive letter and select Properties> Material to view all your disks and find the full hardware name of the device. This will help you locate the drive on the DBAN.
2. Download and write DBAN to disk
DBAN is available in ISO format. You need to download it to your computer and then burn it to an optical disc.
a. Download it DBAN from Sourceforge.
b Insert a blank disc into the optical reader / recorder.
c. Browse the downloaded archive ISO.
d. Right-click on dban-2.3.0_i586.iso and select "Burn disk image".
e. Do all the steps required by Windows to write the ISO to the optical disc.
f. When finished, remember to mark the disc. You may want to use it again. On the contrary, you would not want to load it by mistake.
3. Back up your valuable data
Before deleting your disk with Windows, it is important to make sure that the data on the drive is 100% useless. If there is something you want to keep, you should back it up immediately. Recovery tools will be useless if you accidentally delete data you want to keep. Your data will be deleted irreparably after using DBAN.
4. Start at DBAN
To use DBAN:
a. Insert the optical disc into the optical drive.
b. Restart your computer.
c. Select the option to boot the computer from the CD or DVD drive.
We know this is easier said than done, but there are no clear guidelines. It depends on the bios of each computer. Usually, your computer starts from the hard disk by first reading the optical disk. If this does not happen on your PC, rearrange the boot devices in the computer BIOS. Alternatively, press a key (usually DEL or F12 - check your computer's instructions for details) when the computer is still in its initial boot and is looking for the boot screen.
With the correct boot device selected, DBAN will start, ready to start erasing hard drives.
5. Erase your hard drive with Darik Boot and Nuke
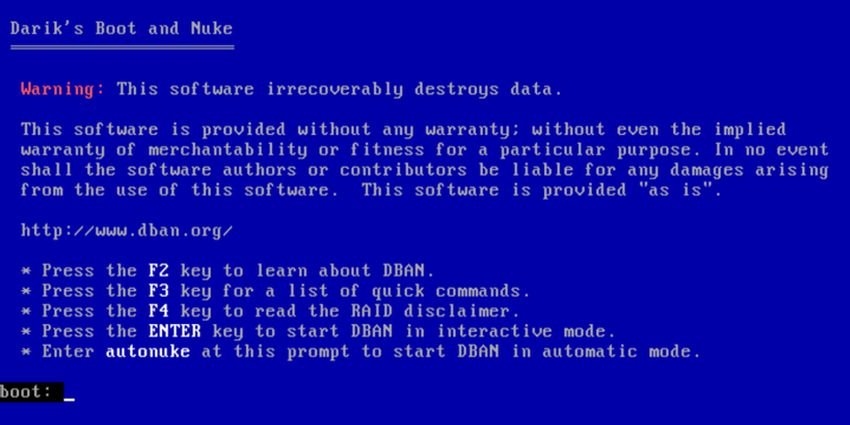
Various options are available on the DBAN screen:
- F2 to learn about DBAN
- F3 for a list of commands
- F4 for troubleshooting
- Click Enter to use DBAN in interactive mode
- Enter the phrase autonuke to allow DBAN to automatically erase every drive on your computer
You probably do not want to use the last option. Instead, use the following guided function to delete a drive:
- Click Enter to start the interactive mode.
- Use the keys arrow to select the device you want to delete.
- Click Space to highlight the drive with the [wipe] flag.
- When you are ready, press F10 to start the deletion process.
You have some additional options available. The shortcut keys that appear at the bottom of the screen allow you to make changes to the delete process.
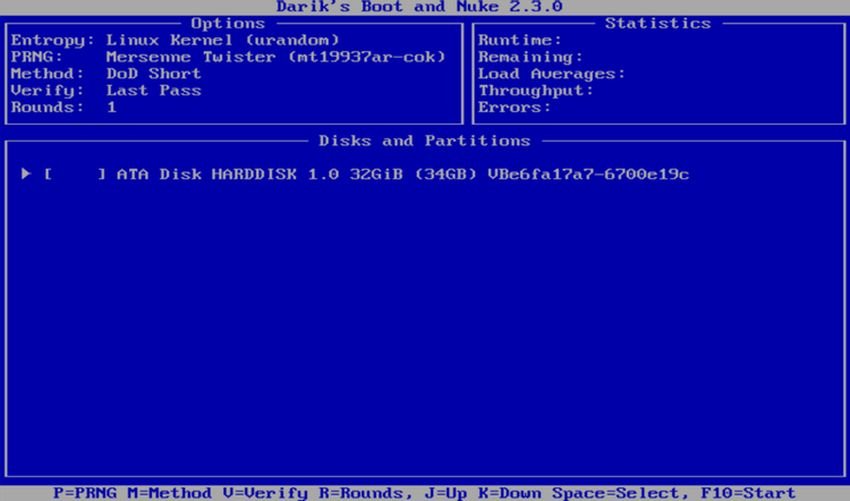
- use it P to change which random number generator is used to destroy your data.
- The R changes the number of passes for each disk sector. This multiplies the default passages for each available deletion method. For example, the default DoD Short has three passes by default, so using R allows you to change it to nine passes by specifying a value of 3.
- The M gives you a choice of six deletion methods, including DoD Short, DoD 5220.22-M and Gutmann Wipe.
- You can also enable a verification function ( V ), although this prolongs the deletion process.
A timer in the upper right of the DBAN tool displays the duration of the deletion process. Finally, a new "pass" screen should appear in green next to the drive name. If you see it you are free to reuse the drive.
If the word "fail" appears, try using DBAN again. If this happens repeatedly, consider a natural disaster (see below).
| What can you do with a deleted hard drive? |
Once you delete the hard drive, you can safely sell or reuse it. For example, you can sell it on eBay or give it to a relative.
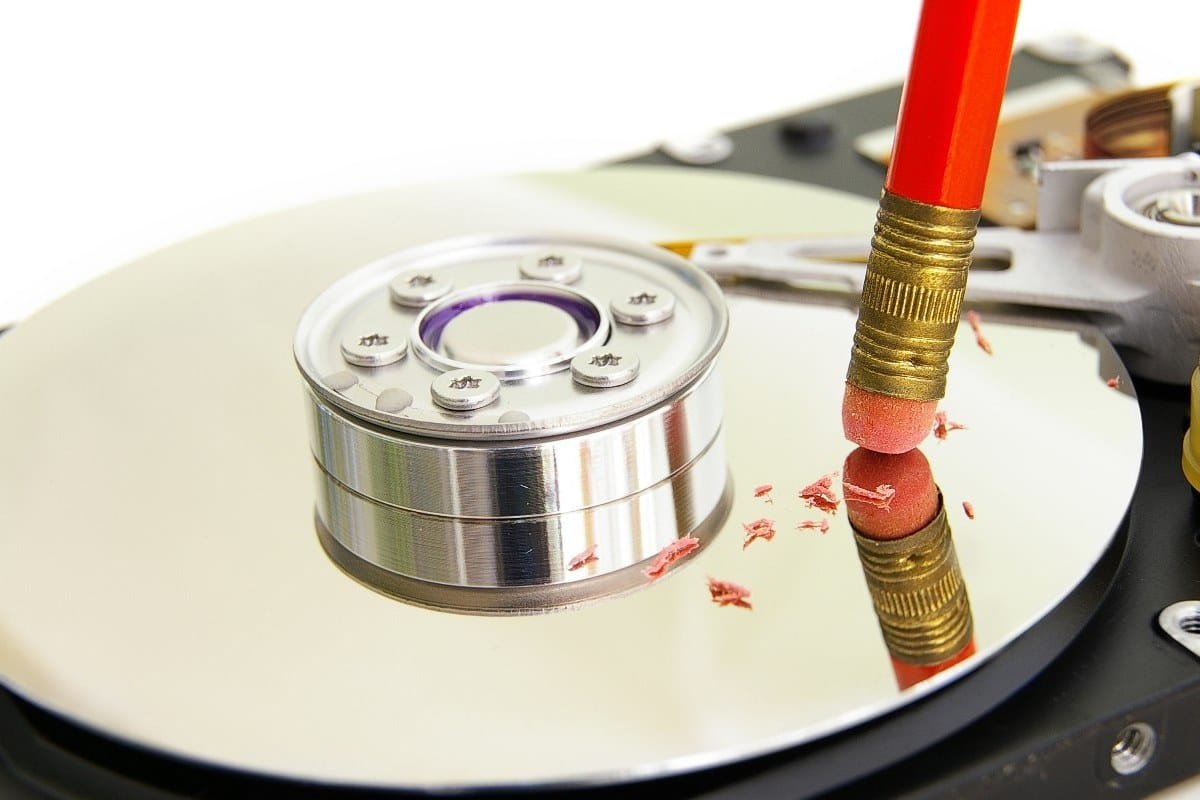
The most important thing to know is that it is almost impossible to recover data. If you still do not want to give it somewhere and in addition you want to make sure that even the best specialized user will never be able to read it, then use some physical damage to the device, perhaps by drilling in the driving points.
Additionally for crazy people, open the drive and smash the magnetic disks where your data is stored with a hammer !!. After scoreput them in different garbage cans, away from your neighborhood. Make sure he doesn't track you!
Although here we are talking about ίζ do you think you will sleep peacefully at night?
